About a month ago Jason Fitzpatrick wrote an article for Lifehacker titled: How to Clip, Sort, and Cite the Entire Web with Zotero. It provides a short overview of Zotero, the free and ever improving reference citation software program. Jason looks at some ways to extend the usefulness of Zotero beyond the obvious use of typical academic references. Check it out:
Showing posts with label Software. Show all posts
Showing posts with label Software. Show all posts
Thursday, March 10, 2011
Wednesday, February 9, 2011
Getting to Know OPML
David Sparks, creator of the Macsparky website and author of the book Mac at Work, posted a blog entry about three weeks ago titled: Dancing with OPML. If you don't speak geek, OPML stands for Outliner Processor Markup Language.
If you work with mind maps, visual organizers, outliners, or Scrivener then you most likely want to become acquainted with the OPML format. Put simply it will allow you to share information across different programs: such as starting an article structure in MindNode Pro mind mapping software, exporting as OPML, then bringing into Scrivener with your writing structure intact!
There's lots of good things about OPML, and David did a great job of explaining the benefits of this format. I highly advise reading his article titled:
Note: This post has also been published at the Scrivener blog since going from iPad to Scrivener is one of the great benefits of OPML.
Monday, February 7, 2011
Zotero Growing Up!
There's been murmurs for awhile that Zotero was going to develop a standalone software program version. For those of you who've been watching too much t.v. or simply not into library stuff, Zotero is a fantastic integrated reference manager. What does that mean? Up until now it meant that if you did a research database search (think using a university library's research databases), saved the interesting articles in the database (typically easy to do), then you could save all of that reference information to Zotero—as long as your web browser was Firefox and you had the Zotero plug-in installed.
While Zotero works very nicely, and is free, there's a few key limitations. First, it only works with Firefox. Today an alpha version of Safari and Chrome extensions were provided! These are early versions, and I found my Safari extension didn't work in a lot of real world situations, but . . . it's great to see that somewhere this year we will have versions of Zotero that work smoothly in Safari and Chrome browsers.
A second limitation, and a huge demand, was to have a standalone application. Today they also released an alpha version of this for both Mac and Windows. My guess is that I'll end up using Safari to identify and send new research references to Zotero with one button push. And I'll probably use the standalone version for all the organizing into groups, creating bibliographies, exporting work.
Check out the new alpha download (if you are brave and comfortable with computers) plus read all about this new step forward at:
Saturday, December 11, 2010
Tree Outliner
If you are a Mac-user then you may want to consider adding Tree, the outliner software program, to your toolkit. There are several outlining programs available, including the great OmniOutliner. Tree offers a lesser number of features than OmniOutliner, but the features it does offer are implemented spectacularly well.Tree is an outliner, but with three key twists.
First, you can easily set up the default fonts for outlines and nested notes, colors, and other options. Once this is done the whole look-and-feel of Tree is elegant and simple. It's a joy to use functionally and aesthetically.
Second, traditional outliners are vertical in nature: first level entries, second level entries, and so on. Tree can do that if you want, but the default behavior is horizontal. First level entries are all to the far left, second level entries indented to the right, and so on. I can't really explain why, but the resulting outlines are much easier for me to view and "see" the big picture. Literally to see the tree from the branches.
Third, Tree uses tabs. A small, but incredibly useful feature. This means in my main Tree window I can have three, five, seven outlines open all at the same time in an organized manner. Just click on the relevant tab to go to another outliner to work on. In my job I develop a few outlines that continually need to be updated or refined. This tab structure works beautifully. Typically I'll have no more than 4 or 5 outlines open in tabs. Fortunately Tree remembers what tabs you had open at your last usage of the software, so when you start Tree up it will automatically open all the previously opened tabs. This is very efficient and a great time saver.
Any disadvantages? A few. Tree does not offer as many options as OmniOutliner Pro, but instead offers different features. Cost: the program costs about $38. (You actually pay in Japanese Yen.) Third, the documentation is sufficient but probably could do with some additional examples and elaboration.
In a way the Tree outlines look something like mindmaps. This makes sense as mindmaps are essentially visual outliners. If all you were typing in were essentially "labels" (one or two word descriptors) then a mindmap might do as well or better. But for true outlining I find Tree to be the better choice.
Tree may be a revelation for you (as it was for me) or simply "who cares." But if you're a Mac user you owe it to yourself to check it out and take Tree for a test drive.
Sunday, December 5, 2010
RapidWeaver 5 Released
This past week RealMac software touted a major upgrade to RapidWeaver, their template driven website design software (Mac only). I love RapidWeaver and used it to design this website as well as all my course websites.
The big question for some is: Should I upgrade to version 5? In general my answer is "No." However, in some cases there are likely people who do want to upgrade right away. There are a few current problems with RapidWeaver 5: (1) the upgrade is $39, (2) there aren't a lot of obvious beneficial features, and (3) the various third-party plugins, themes, and stacks haven't all updated themselves to be version 5 compliant. In addition, version 5 is demonstrating a fair number of bugs (depending on your specific computer set up and plugins).
The second question is: Should I ever upgrade to version 5? In general my answer is "Yes." I'd suggest waiting until the various bugs have been squashed, and all third-party add-ons have been updated to work with the new version. In addition, the current version has paltry documentation, but proper documentation should come along in the next month or two. Perhaps around March or April would be a good time to update.
RapidWeaver 5 mainly has a lot of under the hood improvements that end-users won't benefit from until third-party add-ons take full advantage of them. So further down the road upgrading (and thus paying $39) may be worth it.
I think there may be an exception to the "wait to upgrade" approach. If your current version of RapidWeaver is unstable (i.e. it crashes a lot) then an upgrade may help. In my initial testing RapidWeaver 5 is a lot more stable than version 4. However, if you really have an unstable setup you'd want to first check that the problem doesn't lie elsewhere—typically old add-ons that are not at their most recent version or that have been discontinued.
All in all, version 5 is a bit of a disappointment for several reasons. However, I'm fairly confident that by the time spring rolls around we'll start to see the practical benefits of this change.
Monday, October 25, 2010
OmniFocus: 2 More Reviews
OmniFocus is a great software product for getting things done. I've posted about OmniFocus previously (see earlier posts). However, I wanted to share two recent, and very thorough, reviews of the OmniFocus product. This product is available for Mac computers, iPhones, and iPads.
The first post is titled: How I Use OmniFocus to Organize My Life. Check out the post here:
The second post is titled: A Sledgehammer Called OmniFocus. The author, Shawn Blanc, nicely covers alternatives to OmniFocus as well in his article. Check out the post here:
The first post is titled: How I Use OmniFocus to Organize My Life. Check out the post here:
The second post is titled: A Sledgehammer Called OmniFocus. The author, Shawn Blanc, nicely covers alternatives to OmniFocus as well in his article. Check out the post here:
Thursday, October 14, 2010
Zotero Making Exciting Updates
Zotero is the wonderful web-based software that allows people to very easily collect references from online databases such as ERIC and PsychInfo. For students and academics Zotero is a free and great resource for collecting, organizing, and exporting references that can be easily imported when using an online database such as PsychInfo.
The downside to Zotero has been that it only works with the FireFox web browser. All of that is about to change. The developers are working hard at creating plugins that work with Google Chrome (Win and Mac) and Safari (Mac). Moreover, they are creating a standalone version of Zotero!
To find out more about upcoming updates to Zotero, check out this article:
Saturday, September 11, 2010
ScreenFlow 2 Update
Recently I wrote about the wonderful ScreenFlow software program for doing recordings of what's on your screen to create screencasts. One of the best features of ScreenFlow is the editing environment after you've recorded what's on your screen. In addition, ScreenFlow is great for making different sorts of multimedia products. For example, you can add still images, other video (e.g. from a Flip camera), and other audio to your original screen capture product.
However, what if you want to use ScreenFlow for creating multimedia where you don't need any screen capture video? Does it still work well? The answer is yes! There is a trick to get this to work easily—the trick is needed because when you start up ScreenFlow it will assume you want to start recording a new screen capture. You can close this recording window, but you have no way to start off with a blank project. That's where having a template comes in handy! I recently created a ScreenFlow project template that I named "ScreenFlow 1024 Template." This just tells me the size of the template is 1024 x 768 pixels. When I open it up there's only one media element in it: a Photoshop document of a scanned image. I can now easily add other media elements: audio, video, images. I can also easily delete the one starter image. Voila, now I have a very quick way to start a new multimedia project in ScreenFlow without having to take a bunch of extra steps.
Except for projects that involve a large number of images (40 or more), I'll likely be using ScreenFlow for all my multimedia projects now. (For those projects with large number of images I'll use FotoMagico Pro as it handles them better.) If you'd like a copy of my template, send me an email and I'll provide a link so you can download it. Of course, you'll need to have ScreenFlow itself installed on your Mac computer!
Sunday, August 29, 2010
ScreenFlow 2
There are two main multimedia creation tools I use on my Mac: FotoMagico Pro and ScreenFlow. There are some overlaps between these two great programs. FotoMagico Pro is better at handling multimedia created out of lots of still images. You can also add audio and video, but the focus with FotoMagico is using still images. On the other hand, ScreenFlow is primarily a screen video recording program that has powerful editing abilities. If you are primarily shooting video of what's on your computer screen, or want to bring in video from other sources (such as Flip cameras and the such), then ScreenFlow is likely the best choice of these two applications.
You can download a screencast (i.e. a movie that shows what's on my computer screen as I go through various tasks) to see a practical example of a ScreenFlow production. In this case I shot a Keynote presentation combined with live audio. Later I edited the audio and video as warranted. The movie is 11 minutes long, is a 24 Mb download, and works beautifully on an iPad (as well as a computer).
ScreenFlow version 1 was a solid release, but with version 2 they have added important features that make editing and finishing your movie easier and better. The software will record what's on your screen, plus record your audio input, plus record the video from your iSight camera (if you have one) into one integrated recording. Once done recording you are taken to the ScreenFlow editing area where you do the regular stuff (delete, copy, and so forth). However the editing environment also allows you to do many additional procedures very easily. This includes swapping the computer cursor for a custom cursor (I like a big red arrow), adding text titles or descriptions where you want, creating chapters, easily adding transitions between movie clips, creating focus effects through features like magnifying towards one part of the screen, plus many other special editing options.
Years ago SnapzPro was the best screen recording program on the Mac. But the company that makes SnapzPro has not updated their software in a long time. Camtasia Studio on Windows is a wonderful program, but their sister app—Camtasia for the Mac—is not nearly as powerful or reliable as the Windows counterpart. That leaves ScreenFlow as the best application for creating cleanly edited movies on your Mac—especially when the main focus of the movie is on capturing what's happening on the computer screen. ScreenFlow is powerful enough to be a great multimedia glue application that combines video, still images, and audio even if you don't record any video of your screen! An über-powerful program like Final Cut Pro might be better, but ScreenFlow is much cheaper ($99, $90 for academics) and much easier to master relative to Final Cut Pro.
A search via the web will bring up many good reviews of ScreenFlow 2. However, some of these reviews have been collated on one page:
If you are considering making multimedia movies that play well on Windows, Macs, and iPads then you'll want to strongly consider ScreenFlow if you're a Mac-user.
Wednesday, August 11, 2010
OmniFocus for Getting Things Done
Over the past two years there has been a great influx of Getting Things Done applications—some software based, some web based. While all of these options are dressed up "to do lists, they typically offer many more features than a simple checklist. If you're a Mac-user the most complete solution is called OmniFocus and is made by OmniGroup (makers of OmniOutliner and OmniGraffle).
OmniFocus comes in a Mac form, iPhone form, and just lately an iPad form. The good folks at appstorm just published a very good review of OmniFocus for the iPad. If you're interested at all in being more productive, it's certainly worth your time to read their very complete review.
OmniFocus comes in a Mac form, iPhone form, and just lately an iPad form. The good folks at appstorm just published a very good review of OmniFocus for the iPad. If you're interested at all in being more productive, it's certainly worth your time to read their very complete review.
Monday, April 26, 2010
Transcribing with Scribe
I've had dreams about software that would magically transcribe audio into written text. No more tedious manual transcribing that takes hours on end! Easy conversion of spoken presentations into text documents! Alas it was a dream without an anchor in reality. However, now that "dream" is starting to become a reality.
This is a very quick review of a new Mac software program named MacSpeech Scribe. Most software of this ilk works using a dictation model: talk into your computer and your voice gets converted into text or into a specific computer operations. There are several practical downsides to the dictation approach including:
Note that you can choose to do additional transcription training at any time to refine its capabilities. The vocabulary training and vocabulary editor options are very important—though I haven't used them yet. You can learn more about them by downloading the Scribe User Manual that I provide at the end of this post.
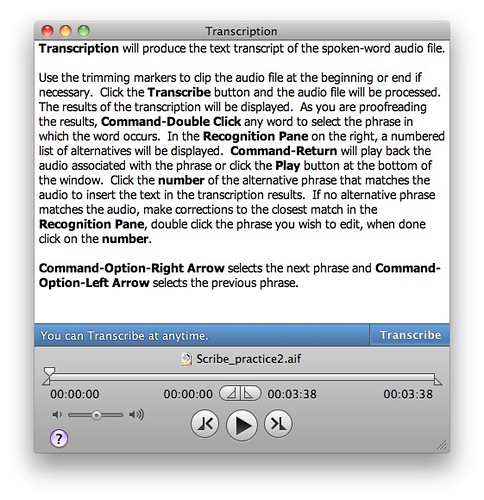
If you choose the Transcription button, then the next window you'll see is below. Before the window appears you will have been asked to supply an audio file. You can see the audio file ready to play at the bottom of the screenshot. Simply press on the Transcribe blue button and the software will begin the transcription process. It seems to take about a minute-to-two-minutes to process each minute of audio I've provided.
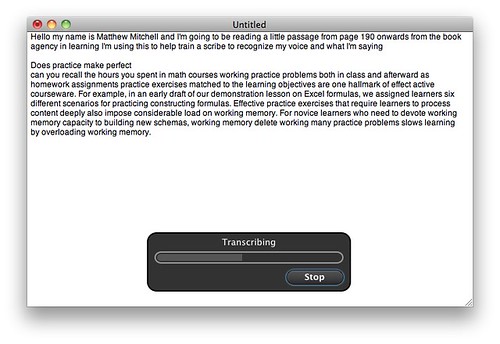
Below you see the results of the transcription process about half way through Scribe processing the entire file. You'll notice that I've created headers, periods, commas and other grammar by using simple spoken indicators during the recording process.
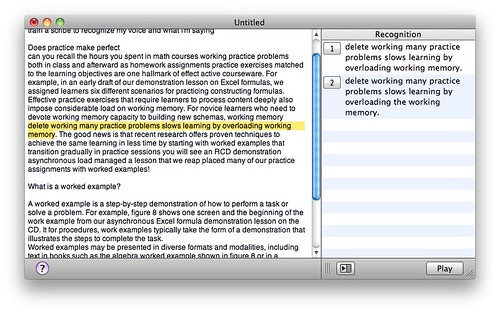
The final screenshot below shows a portion of the final transcribed audio. Notice that I'm currently on one specific "chunk" of audio (highlighted in yellow on the left side) and Scribe shows me it's best transcriptions on the right. In this case Scribe provides two possible alternatives. Don't remember what you exactly said? Not a problem, click on the Play button (bottom right side) to hear only that chunk of the audio. I can't emphasize enough what a brilliant feature this is. Even if I recorded someone else, and the transcription was only 60% accurate, this very detailed playback of discrete chunks of audio would make the transcription process much less painful and time-consuming for me.
The biggest weak link in this product will be the quality of your audio recording. When doing research on this product it seemed reviewers either loved it or hated it. No one was in the middle. That indicated to me that the real "culprit" is the clarity and quality of the audio recording itself. My initial tests confirm that impression. Record in a quiet office with a good recording setup and you should expect great results (once there's been appropriate training). Record with a cheap portable recorder while in a busy and loud airport and you should expect much more modest results. To learn more about good portable recorders to buy, visit my previous post titled Getting Started with Audio Recorders.
Even if you have a less-than-optimal audio recorder, given the way the transcription editing process has been designed into the software, it seems creating transcripts from less than stellar recordings (or using multiple voices) will still end up being easier than the alternative of using transcribing machines, foot pedals, and the such. As a final note it seems the software only recognizes English right now. I'd guess that Spanish and other editions will be released sometime in the next year, but I'm not sure about that.
If you want to learn more then consider visiting the product website or download the user manual. Links to both are provided below.
This is a very quick review of a new Mac software program named MacSpeech Scribe. Most software of this ilk works using a dictation model: talk into your computer and your voice gets converted into text or into a specific computer operations. There are several practical downsides to the dictation approach including:
- Most dictation software needs to be hooked up with relatively cheap USB headsets—and often don't work well with better recording setups and not at all with non-computer portable recorders.
- The dictation is done live on the computer. This results in a lot of intensive computer activity. Put differently, dictation software is ripe for resulting in computer crashes—you lose not only the dictated text but also the audio recording. The result is you need to start all over again.
- Dictation software is pretty accurate, but not accurate enough to save loads of time. For example, with an accuracy rate of 90% (which is very good), you'll still need to do careful editing of your document. In the end you may not save time, or may end up spending more time, relative to just writing the normal way.
Critical Differences in the Scribe Approach
There are four critical differences relative to dictation software in the approach Scribe takes.- Scribe uses pre-recorded audio. This is very good for several reasons. First, even if your computer crashes then you still have the original recording to use. It means you can record in your office, at home, out in the jungles of Ecuador, or perhaps on the streets of Paris. This approach provides greater flexibility by separating the recording process from the transcription process.
- Scribe allows up to 6 profiles. You can train Scribe to recognize six different voice profiles. This can be very convenient. I can establish a profile for myself, another for my wife, and so on. There are a couple of key caveats here. If I record on my office recording system and then on my portable in-the-field recorder then I'll need two different profiles for myself. We tend to think that in both cases "our" voice has been recorded—but our voices will sound different enough in the two cases that differing profiles should be created. The second caveat is that transcription can happen only using one profile at a time. If a recorded conversation is used with Mary, Mark, and Mylene then you'll have to use a "best fitting" profile to use for these voices. As a result transcription results will be less successful.
- Scribe accuracy. I've done two relatively short tests (using a 2 minute audio and a 4 minute audio) and I already see that Scribe can quickly become quite accurate. I'd estimate that after only two training sessions Scribe is nearly 90% accurate with my voice. That's impressive. However, there are some key caveats. Quality of recording will make a big difference here. If you record into your computer's built in microphone, then don't expect great results. Over 50% for sure, probably close to 70% with adequate training, but computer mics are lousy. A good voice recorder will save you a lot of time in the long run. Invest money now in a good portable recorder, and save lots of time later if you want to use this type of software.
- Scribe flexibility. To me the major plus of Scribe is the flexibility and "smarts" it offers. Specifically here's what happens: it transcribes as best as it can, then it presents you with a double-paned window for you to review the transcription. Essentially your audio is divided up into "chunks." When you click on an area in the transcription, then the software's transcription for just that chunk shows up in the right hand pane. Most of the time you'll see 2 to 4 possible transcriptions for the chunk. You can choose the right transcription, or edit the nearest transcription for that chunk to make it exact. The magic is that Scribe allows you to play only the portion of the audio file related to each chunk of text. This means you don't need to madly sort through the audio recording to find out what you actually said!
Scribe Software Step-by-Step
When you start up Scribe for the first time you are forced to do an initial transcription training session. The software asks you to provide 2 minutes of audio to use. However, once you've completed the initial training, then when you start up Scribe you'll see the following window:Note that you can choose to do additional transcription training at any time to refine its capabilities. The vocabulary training and vocabulary editor options are very important—though I haven't used them yet. You can learn more about them by downloading the Scribe User Manual that I provide at the end of this post.
If you choose the Transcription button, then the next window you'll see is below. Before the window appears you will have been asked to supply an audio file. You can see the audio file ready to play at the bottom of the screenshot. Simply press on the Transcribe blue button and the software will begin the transcription process. It seems to take about a minute-to-two-minutes to process each minute of audio I've provided.
Below you see the results of the transcription process about half way through Scribe processing the entire file. You'll notice that I've created headers, periods, commas and other grammar by using simple spoken indicators during the recording process.
The final screenshot below shows a portion of the final transcribed audio. Notice that I'm currently on one specific "chunk" of audio (highlighted in yellow on the left side) and Scribe shows me it's best transcriptions on the right. In this case Scribe provides two possible alternatives. Don't remember what you exactly said? Not a problem, click on the Play button (bottom right side) to hear only that chunk of the audio. I can't emphasize enough what a brilliant feature this is. Even if I recorded someone else, and the transcription was only 60% accurate, this very detailed playback of discrete chunks of audio would make the transcription process much less painful and time-consuming for me.
Summary
Previously I had encouraged people not to buy dictation/transcription software. There were too many flaws in previous products. MacSpeech Scribe was released in March 2010 and offers very significant improvements over previous options. If you have the need, and pay attention to the caveats I mentioned earlier, this could be a great product to assist with either research or teaching. $150 is a very reasonable price given the power of this product.The biggest weak link in this product will be the quality of your audio recording. When doing research on this product it seemed reviewers either loved it or hated it. No one was in the middle. That indicated to me that the real "culprit" is the clarity and quality of the audio recording itself. My initial tests confirm that impression. Record in a quiet office with a good recording setup and you should expect great results (once there's been appropriate training). Record with a cheap portable recorder while in a busy and loud airport and you should expect much more modest results. To learn more about good portable recorders to buy, visit my previous post titled Getting Started with Audio Recorders.
Even if you have a less-than-optimal audio recorder, given the way the transcription editing process has been designed into the software, it seems creating transcripts from less than stellar recordings (or using multiple voices) will still end up being easier than the alternative of using transcribing machines, foot pedals, and the such. As a final note it seems the software only recognizes English right now. I'd guess that Spanish and other editions will be released sometime in the next year, but I'm not sure about that.
If you want to learn more then consider visiting the product website or download the user manual. Links to both are provided below.
Friday, April 9, 2010
Zotero-mania Sweeping the Nation
Zotero is the wonderful cross-platform web-based program for gathering and organizing references. And it's free! Well, that's not quite true as the "cost" of using Zotero is that you need to be using Firefox as your web browser in order for it to work. In my case this means I need to consciously switch from Safari to Firefox whenever I want to gather more bibliographic references into Zotero from my library's research databases, or Amazon, or other sources. If you have a dedicated bibliographic software program (such as Bookends or Endnote), Zotero can easily export information in a format that these other software programs can read.
Zotero has been around for almost two years, but relatively recently two things reminded me of this very powerful tool. First, Zotero has recently been upgraded to version 2. To find out how it works, and about its added features, check out the Zotero website.
Second, more and more organizations are using Zotero. (Well, why not? It's great!) Recently the Harvard Kennedy School of Government Library posted 4 short screencasts about how to use Zotero. It's worth checking out, especially as an introduction to the product. (Note: the Zotero site itself also provides some screencasts, but it's interesting to see how other organizations and libraries are embracing the goodness of Zotero.)
Once in awhile I get questions about how to create a bibliography (for a paper) directly from Zotero. I keep forgetting how to do this myself (as I don't use this feature often), so I thought it would be useful to provide a direct link to Zotero's website explaining how to create bibliographies without exporting to another program:
Monday, March 15, 2010
DevonThink Pro 2 & Annotations
The very powerful (Mac-only) software named DevonThink Pro was released on February 24th. This new version represents major advances over version 1 of the same product. Put simply, this is software for organizing and working with large amounts of information. Put differently, it's perfect for working with a large number of research articles (and thus is perfect for doctoral students and professors).
To find out more about this product, please read more at the DevonThink Pro website, you may especially want to look at the unique features webpage. The academic price for DevonThink Pro is $60, and the academic price for DevonThink Pro Office is $112. (The company offers an academic discount of 25% on all their products). You can see a comparison chart of the two. (Note: you won't want to buy the Personal or Note versions as they leave out too many power features.)
One of the new power features of this software is the ability to create annotations that are integrated with the research article (or any other document) of your choice. I've created a 9.5 minute screencast that takes your through both why and how to use this very exciting feature. If you're interested, download the DTP Annotations tutorial below:
Monday, March 1, 2010
weaverFM: Amazing New Plugin
I love using the wonderful RapidWeaver softwareprogram that allows people to develop great websites with much less pain and confusion relative to using something like Dreamweaver (and hence the product's name). It's a powerful software program that also has spawned a number of third-party developers creating plugins for RapidWeaver.
About two weeks ago a new plugin was released for Rapidweaver named weaverFM where the FM stands for file management. weaverFM allows you to have a cloud-based file management system on your website where designated users (e.g. students) can upload materials, download them, create folders, and so on. It's almost as if the website is a natural extension of their own computer's desktop!
This is certainly one of the most significant plugins to be developed for RapidWeaver. I'm enthusiastically using it this semester in one of my classes. There are three key ways to learn more about this product:
Sometime in the summer I'll write an extensive review based on my semester-long experiences implementing it in one classroom.
About two weeks ago a new plugin was released for Rapidweaver named weaverFM where the FM stands for file management. weaverFM allows you to have a cloud-based file management system on your website where designated users (e.g. students) can upload materials, download them, create folders, and so on. It's almost as if the website is a natural extension of their own computer's desktop!
This is certainly one of the most significant plugins to be developed for RapidWeaver. I'm enthusiastically using it this semester in one of my classes. There are three key ways to learn more about this product:
- The RapidWeaver Central website has published a very comprehensive review of the software. Check out their weaverFM review (complete with many screenshots).
- I've created a 17 minute tutorial (for my students) about how to use this feature of my course website. The tutorial won't show you how to use weaverFM, but it will give you some decent detail about some specific ways it could be implemented in a classroom environment. You can download my tutorial (keep in mind that it's a 75 Mb download).
- Third, you can visit the man himself, Gregory Barchard, who created this amazing plugin. His website provides additional details about the plugin and how to use it. So meander on over to Greg Barchard's website.
Sometime in the summer I'll write an extensive review based on my semester-long experiences implementing it in one classroom.
Thursday, November 19, 2009
Google Sites adds templates
The folks over at Google are updating their tools at a crazy frenzy. This week they released a wide assortment of templates to use when starting a Google Sites website. Why is this important? The template does provide a "look and feel" to the website, but more importantly it provides a complete structure. You can later tinker or add or delete to that structure if you so desire. You can read the complete announcement here:
Here's what used to happen. Creating a new website meant having one webpage. Then you would add another webpage and have links between them. And so on and so forth. Using their templates you can start with a complete structure to your website. I tested out one of their many templates for creating a co-shared work project. I automatically got a 9 page website with clear links between them: one page for downloading files, one for keeping track of how much of the project has been completed, and so forth. The addition of templates now makes Google Sites much easier to get started with (and it was pretty easy before). Check out the short video below:
Here's what used to happen. Creating a new website meant having one webpage. Then you would add another webpage and have links between them. And so on and so forth. Using their templates you can start with a complete structure to your website. I tested out one of their many templates for creating a co-shared work project. I automatically got a 9 page website with clear links between them: one page for downloading files, one for keeping track of how much of the project has been completed, and so forth. The addition of templates now makes Google Sites much easier to get started with (and it was pretty easy before). Check out the short video below:
Monday, November 9, 2009
Staying on Top of Research
 Paris_2009_07-214, originally uploaded by Mathew Mitchell.
Sure the girl in the photo looks happy—but she hasn't lost any research papers, or is frustrated by her inability to keep on top of research. Can you say the same? Over this past weekend I briefly showed students in two of my courses a Mac-only software product that does a great job of organizing your research, enhancing your ability to find connections, and glueing together research articles with your notes about each article. Plus more. I'll be writing extensively about this product, DevonThink Pro, over the next nine months, but for now I want to provide a very brief overview of software tools to help you stay on top of research.
DevonThink Pro for the Mac
This is one amazing product—especially for organizing, sifting, connecting, annotating, and more to a large body of research articles. It's only in the past six months that the company came out with their first beta of version 2. Currently we are at beta version 7. This means it is currently a very stable product but does not contain all the features that the final version 2 will have. You can download beta versions for free.Version 1 of this product was okay, but not something that I would recommend to others. Version 2 is a completely different matter. Very sleek, very effective. But still evolving. Just last week one of the developers added on the script for doing linked annotations between a research article and your personal notes about the article (as I demoed in class).
You'll need to go to their website to read more about the product. But if you're a Mac-user and your work includes collecting and making sense of lots of different documents, then I wholeheartedly recommend this product. In January and February I'll make a short set of short video tutorials about this product—the tutorials won't be complete, but they'll show how to use the product specifically for organizing your research. I'll also provide a "template" version of my cognitive psychology readings if someone wants a starter kit to get going with this product.
Like any free-form database (and you'll see more below) the onus is on you to provide a basic structure to the content. But once that basic structure is in place then you'll have a very powerful ally for understanding research. The professional version of DevonThink costs $60 with the educational discount. The "office" version of DevonThink costs $113 with the educational discount. You can also buy the professional version and later upgrade to the office version without paying extra money. The DevonThink website provides a helpful comparison chart of differences between their products. (Note: you definitely don't want the "personal" edition as it simply isn't powerful enough for research purposes.)
OneNote for Windows
I've heard many good things about this Microsoft product. Is it as all encompassing as DevonThink? No. Could it be a useful tool for you? Perhaps. This is how the product is described at the Microsoft website:OneNote is an electronic version of a paper notebook where you can write down notes, thoughts, ideas, scribbles, reminders, and all kinds of other information. Unlike the traditional document formats used by other programs such as word-processing or spreadsheet programs, OneNote offers a free-form canvas where you can type, write, or draw notes in the form of text, graphics, and images wherever and however you want them.You can buy it for $45 at AcademicSuperstore. Some of you may already have it bundled into your Windows computer software.
Unlike notes in a paper notebook, OneNote lets you add, move, and delete anything on its pages and in its sections. You can add more space where and when you need it, and you can stay organized by dragging note items into their own sections or even into multiple notebooks. You can separate and organize your notes by subjects or projects, or keep separate notebooks for different places and interests.
AskSam for Windows
This is a free-form database program. I recently heard a former Windows user write that he used to use this program before switching to a Mac. Here's how the company's website describes the product:askSam is the ideal application to organize your information. askSam is a different kind of database - a free-form database designed for users rather than programmers. askSam makes it easy to turn anything into a searchable database: email messages, word processing documents, text files, spreadsheets, addresses, Web pages, and more.I especially recommend looking at the Quick Tour for Researchers presentation at their website. It seems to come in a standard ($150) and professional ($395) versions. I don't know if they offer academic pricing.
askSam gives you the power of a database without the complexity. No need to program or learn a complicated query language. With askSam, you simply import or enter information, and you're ready to search. askSam users range from individuals organizing email, addresses, and research notes to corporations and government organizations managing meeting minutes, regulations, policy manuals, and corporate databases.
UltraRecall for Windows
I found another user who wrote that they used to use AskSam and then switched to UltraRecall. Like DevonThink and AskSam, this product is a free-form database. As they write on their website:Ultra Recall is personal information, knowledge, and document organizer software for Microsoft Windows. Capture documents, web pages, notes, and emails from almost any application, with automatic capture of content, text, and images. Organize information in ways that make sense to you via flags, favorites, annotations, reminders, categorizing, and custom attributes. Recall items quickly with highlighted search results, tagging, multiple navigation methods, history, and advanced searches. Useful for online research, journaling, to-do lists, note taking, document archiving, GTD, issue tracking, product evaluation, and more.This product also comes in two versions and they've provided a webpage comparing the standard and professional versions. The versions are priced at $50 and $100 respectively.
Summing Up
Great new products are coming to market to help researchers stay on top of their work. With one of these products you may start looking as happy and carefree as the young woman pictured above. If you are a Mac-user then get DevonThink Professional or DevonThink Office before spring semester. (It would probably bog you down to get new software right now.) If you are a Windows-user then the situation is more ambiguous. However, I'm hoping that a few of my Windows-using students will choose to trial download the three products described above. It would be very helpful if any testers of these products could comment on this website about what seem to be the advantages/disadvantages of these three Windows products. Hopefully by March we'll have sorted out a clear "winner" for Windows-users as well.Monday, October 26, 2009
Google Docs & Shared Folders
Google Docs is constantly getting updated. It seems there's a noticeable tweak to its features about every month. Why should you care? Mainly because Google Docs is probably the easiest and most powerful way to create collaborative documents via the web. This web-based suite of applications includes a word processor, spreadsheet, presentations, and the creation of forms. Each of these kinds of documents can subsequently be displayed as web pages. So, for example, this means it's pretty easy for you to create forms and have the data automatically placed into a spreadsheet for you.
One of the newest enhancements to Google Docs has been the inclusion of shared folders. This is a particularly welcome addition for doctoral students who may be doing some sort of collaborative work. As stated at the Google Docs Blog:
One of the newest enhancements to Google Docs has been the inclusion of shared folders. This is a particularly welcome addition for doctoral students who may be doing some sort of collaborative work. As stated at the Google Docs Blog:
The biggest update is the introduction of shared folders -- far and away the most requested Google Docs feature. Shared folders work how you would expect them to and we hope they will make it easier for teams and groups to collaborate on documents together.You can keep up with the latest news by bookmarking their blog and checking it out about once a month. Here's the link:
To share a group of items, all you have to do is put them all into a folder and share the folder. As you'd expect, if you add an item to a shared folder, it will automatically be shared and if you add someone to an existing shared folder, they will instantly get access to all of the folder's content.
We've also made it easy to upload multiple items to Google Docs. Instead of picking one file at a time, our new upload page lets you choose multiple files and upload them simultaneously, in just a couple of steps.
Monday, October 5, 2009
Dropbox and iPhones
 Dropbox video, originally uploaded by Mathew Mitchell.
Recently the wonderful Dropbox service came out with their iPhone application (free just like the desktop app). The iPhone application works very nicely and intuitively. I noticed one feature about it that seemed "cute" but dull: it had a favorites feature. When you are looking at any viewable document within the iPhone app you can also mark it as a favorite. I thought this was cute, but not very helpful. I was wrong, very wrong.
The favorites feature not only gives you quick access to certain documents (regardless of folder stored in), but it actually downloads those favorite documents to your iPhone for permanent storage. This is important for two reasons. First, if you have a largish document then you don't need to download it from the web every time you want to view it. Thus accessing this document from an iPhone or iTouch is pretty quick. Second, if you have certain documents you want to view when roaming is turned off (think of traveling to France or England), then you still can because the document is on the phone itself. Thus I already have a number of PDF maps of Paris (including metro and bus routes) in my favorites folder.
Dropbox for the iPhone won't allow you to view all of your documents, but it does allow you to view a wide variety of formats including PDFs, most image and music file formats, Word and Excel documents (both DOC and DOCX or XLS and XLSX), Keynote presentations, Pages and Numbers documents, contact vCards, CSS files and more. It's an outstanding start for version 1 of this application. And the team at Dropbox is already hard at work on an updated version that includes more features. Very impressive.
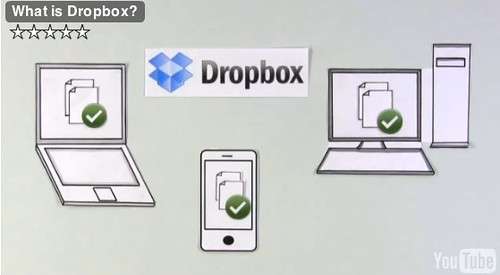
What is DropBox?
Dropbox was first released about a year ago. It's a great way to sync and share documents between various devices. You can easily share documents with other users, or share documents across various devices you own, or both. The folks at Common Craft recently created a simple, effective overview of Dropbox:Thursday, September 24, 2009
Flickr Pro: Why it was my choice
 Paris_2009_07-356, originally uploaded by Mathew Mitchell.
During the past month I explored a variety of options for sharing photos. I looked at SmugMug (great for real professionals), Picasa, MobileMe, and a bunch of other solutions. But for my purposes, the best choice was Flickr Pro.
Flickr comes in a free version that limits you to storing 200 photos total. That's a perfectly fine solution for some people, but I chose to pay the $25 per year upgrade to the pro version so I'd have the ability to upload as much material as I wanted, at whatever size I wanted. In and of itself, this doesn't make Flickr Pro special—SmugMug and others do the same thing. So what made Flickr the right choice for me?
It all has to do with the internet. If I want to do something special with my images, then I'll print them out or I'll create a multimedia presentation out of them. I don't need a web-photo service for showing stuff. But what I would like to do is have a very easy way to share images with other people, have multiple pathways for getting images to my web-sharing service, and have a pretty-cool way to display lots of images. In all these ways Flickr Pro shines.
Easy Sharing
All photo sharing services make it easy for someone to come to their website and see your photos. But that's not what I wanted. Instead I wanted a place to store photos and then reuse them easily. Sure, some friends and family may go to my Flickr location and check things out. What I mainly needed, however, was an easy way for me to incorporate images into blog posts. The blog you're reading right now is on the website where I'm least active—that's because I have several course and professional websites that I need to maintain.Flickr offers a very simple option. For each photo you view at Flickr there's an option above the photo that says: Blog This. You can set up Flickr to send messages to a variety of blogs that you've set up. I use Blogger, and then have my Blogger blogs connect to my RapidWeaver websites. Flickr allows me to send blog posts directly to Blogger. But Flickr also offers lots of other options in addition to Blogger. Just as important, Flickr offers templates for how "image blogs" look for each website blog you connect with. In the case of this post, the image at the top has been set to be 500 pixels wide. You have about 5 other template choices and you can customize as much as you want at Flickr. But the bottom line is once I have a "image blog" template set up then all I have to do is select an image, click on "blog this," write my title and text, press submit and it's all sent to my designated blog in exactly the format I want! Very easy, very elegant.
The image-goodness doesn't end there. If you go up to the image at the top of this post (girl with ice cream cone) and click on the image then you'll be taken to that image within Flickr. And once you're there it's easy to press the "all sizes" button. This allows you to see the image in a variety of sizes, especially a variety of larger sizes. This can be very important in some cases. So Flickr offers me a simple way to create "image blog posts" that also allow the user to choose to see the bigger sized image if they so desire. Nice.
Multiple Pathways
For a website like this one I mainly post photographic images, but for my educational learning websites I'm more likely to post a scan showing how to solve a statistics problem, a screenshot showing how to do a particular step in some software, or post a graphic organizer I created in something like OmniGraffle. Flickr handles all these kinds of images as well. More importantly it's easy for me to upload this great variety of images easily to Flickr. For example, iPhoto has a direct upload option of images to Flickr. LittleSnapper (which I use for screenshots on my computer) has a direct upload to Flickr. There's free Frickr Uploader software, and more. Put differently, more and more software products that deal with images are allowing you to directly upload to Flickr from that software. This increasing level of simplicity for using Flickr with software I already use anyway makes it a much better choice for me relative to other options.Cool Display Options
Flickr seems to play well with others—and this is a consequence of Flickr making it easy for software developers to create products that connect to Flickr images. There's lots of examples around, but my current favorite is Cooliris. You can install Cooliris manually on a website, or if you use RapidWeaver then you can buy a very inexpensive plugin from Joe Workman ($7.95) that allows Cooliris to show up on your pages.For me Cooliris offers a great way to display a large collection of photos relative to the typical photo gallery approach. Cooliris has a very nice 3D effect. When you select a photo within it's "stream" of photos it then enlarges to the size of the Cooliris screen (not all that large). From there you can click on a connect button that takes you directly to that photo in Flickr—where you can enlarge, download, print, share the photo with others. I'm still playing around with my Cooliris settings, but you can see an example of how this works in the Photo section of this website. Cooliris works with other services (such as SmugMug), but from my testing I found that it works easiest and best with Flickr.
Summing Up
I have at least three big reasons why I fell in love with Flickr Pro. It may not be the best solution for everyone, but for those people that have the same photo-sharing priorities as me, I think you'll find Flickr Pro to be a great choice. And for educators it's important to remember that Flickr Pro works well with all images—they don't need to be photographs.
Subscribe to:
Posts (Atom)