David Hewson just wrote an article about using Scrivener when collaborating with multiple authors. He points out some nice tricks—especially good when the other authors use something like Word. Check it out:
Thursday, December 23, 2010
Saturday, December 11, 2010
Tree Outliner
If you are a Mac-user then you may want to consider adding Tree, the outliner software program, to your toolkit. There are several outlining programs available, including the great OmniOutliner. Tree offers a lesser number of features than OmniOutliner, but the features it does offer are implemented spectacularly well.Tree is an outliner, but with three key twists.
First, you can easily set up the default fonts for outlines and nested notes, colors, and other options. Once this is done the whole look-and-feel of Tree is elegant and simple. It's a joy to use functionally and aesthetically.
Second, traditional outliners are vertical in nature: first level entries, second level entries, and so on. Tree can do that if you want, but the default behavior is horizontal. First level entries are all to the far left, second level entries indented to the right, and so on. I can't really explain why, but the resulting outlines are much easier for me to view and "see" the big picture. Literally to see the tree from the branches.
Third, Tree uses tabs. A small, but incredibly useful feature. This means in my main Tree window I can have three, five, seven outlines open all at the same time in an organized manner. Just click on the relevant tab to go to another outliner to work on. In my job I develop a few outlines that continually need to be updated or refined. This tab structure works beautifully. Typically I'll have no more than 4 or 5 outlines open in tabs. Fortunately Tree remembers what tabs you had open at your last usage of the software, so when you start Tree up it will automatically open all the previously opened tabs. This is very efficient and a great time saver.
Any disadvantages? A few. Tree does not offer as many options as OmniOutliner Pro, but instead offers different features. Cost: the program costs about $38. (You actually pay in Japanese Yen.) Third, the documentation is sufficient but probably could do with some additional examples and elaboration.
In a way the Tree outlines look something like mindmaps. This makes sense as mindmaps are essentially visual outliners. If all you were typing in were essentially "labels" (one or two word descriptors) then a mindmap might do as well or better. But for true outlining I find Tree to be the better choice.
Tree may be a revelation for you (as it was for me) or simply "who cares." But if you're a Mac user you owe it to yourself to check it out and take Tree for a test drive.
Friday, December 10, 2010
10 out of 10
Today a new review of Scrivener came out in AppStorm. Rating: 10 out of 10! I'd like to say this happens once in a blue moon, but it's much more infrequent than that.
Beyond getting a high rating, the reviewer does a great job of describing the key features of Scrivener 2. Perhaps more importantly, the reviewer focuses on some key features of Scrivener that I haven't and that many other reviews haven't. Well written, complete, and very helpful. Check it out:
Beyond getting a high rating, the reviewer does a great job of describing the key features of Scrivener 2. Perhaps more importantly, the reviewer focuses on some key features of Scrivener that I haven't and that many other reviews haven't. Well written, complete, and very helpful. Check it out:
Wednesday, December 8, 2010
iThoughts
About a month ago I discovered a mind-mapping app named iThoughtsHD. While I use visual models a lot, I'm not a particular fan of mind mapping software. However, iThoughts works beautifully with the iPad. Simple, intuitive, quick.
The only downside to the app is that it costs $9.99. However, it's worth every penny and more if you plan on using it as part of your workflow.
There are currently four ways that I use iThoughts. First, I sometimes use it just to create a visual model. I export my final product as a PDF—in turn this allows me to upsize the image (if necessary) in something like Keynote with no loss in quality. Second, more often I use it as a way to brainstorm an initial outline structure—after all, mindmaps are essentially visual outlines. iThoughts allows me to export in the OPML format (or Outline Processor Markup Language)—in turn this means I can import my work into almost any dedicated outliner program (such as OmniOutliner, Tree, and several others). Third, I export in the MindManager format (as you can see, there are lots of different formats you can export) and then import into Curio for the Mac. Curio will read this file as a mindmap which I can further develop in that software program. Finally, and most importantly for me, I also export as OPML and then bring into Scrivener (the writing software). When you bring an OPML file into Scrivener's binder area then it will create an automatic structure to your binder area complete with files, sub-files, and so on. Since you can add "notes" to any node in an iThoughts mindmap, these notes get imported into Scrivener as the regular "text" for a particular file in the binder area.
Put differently, a lot of the power of iThoughts isn't just in what it makes, but also in the many ways you can take advantage of its various export formats to further refine your work in a variety of different software applications on your computer.
Check it out for yourself at the iThoughts website. What will be particularly useful to many is the tutorial movie they provide:
Sunday, December 5, 2010
RapidWeaver 5 Released
This past week RealMac software touted a major upgrade to RapidWeaver, their template driven website design software (Mac only). I love RapidWeaver and used it to design this website as well as all my course websites.
The big question for some is: Should I upgrade to version 5? In general my answer is "No." However, in some cases there are likely people who do want to upgrade right away. There are a few current problems with RapidWeaver 5: (1) the upgrade is $39, (2) there aren't a lot of obvious beneficial features, and (3) the various third-party plugins, themes, and stacks haven't all updated themselves to be version 5 compliant. In addition, version 5 is demonstrating a fair number of bugs (depending on your specific computer set up and plugins).
The second question is: Should I ever upgrade to version 5? In general my answer is "Yes." I'd suggest waiting until the various bugs have been squashed, and all third-party add-ons have been updated to work with the new version. In addition, the current version has paltry documentation, but proper documentation should come along in the next month or two. Perhaps around March or April would be a good time to update.
RapidWeaver 5 mainly has a lot of under the hood improvements that end-users won't benefit from until third-party add-ons take full advantage of them. So further down the road upgrading (and thus paying $39) may be worth it.
I think there may be an exception to the "wait to upgrade" approach. If your current version of RapidWeaver is unstable (i.e. it crashes a lot) then an upgrade may help. In my initial testing RapidWeaver 5 is a lot more stable than version 4. However, if you really have an unstable setup you'd want to first check that the problem doesn't lie elsewhere—typically old add-ons that are not at their most recent version or that have been discontinued.
All in all, version 5 is a bit of a disappointment for several reasons. However, I'm fairly confident that by the time spring rolls around we'll start to see the practical benefits of this change.
Saturday, November 20, 2010
Windows Public Beta
On November 1 the first public beta of Scrivener for Windows was released. For the first couple of weeks there were lots of bugs in the releases. It seems the bugs have calmed down a lot. The official Windows release is estimated for February 1 (give or take a couple months).
As the public betas evolve they will exhibit fewer bugs, but also include more features. I suggest only downloading these betas if you are comfortable working with unfinished software that is susceptible to crashing.
You'll also want to re-check the Public Beta page for updates, as well as check the forums. Both links are provided below.
Don McAllister
If you are a Mac-user then you really want to become familiar with Don McAllister. A few years ago he started a series of "screencasts." These are essentially video tutorials that show you exactly what's going on in a software product. Don is very thorough, has a great voice, and his knowledge of Mac software is thorough and deep. Many of his screencasts are now available only to paid subscribers, but from time to time he does create free ones.
Recently Don created a free 36 minute tutorial about Scrivener 2 for the Mac. (It's also a useful tutorial for users of the Windows beta-version.) You can download the screencast directly from his ScreenCastsOnline website, or watch the YouTube version. Both links are given below.
Recently Don created a free 36 minute tutorial about Scrivener 2 for the Mac. (It's also a useful tutorial for users of the Windows beta-version.) You can download the screencast directly from his ScreenCastsOnline website, or watch the YouTube version. Both links are given below.
Wednesday, November 17, 2010
Gwen Hernandez
Gwen is a writer who has a blog named The Edited Life. One of the very cool things she has done is to develop a series of Scrivener how-to posts. Most of her posts were written with Scrivener 1 in mind. With version 2 now released I'm sure Gwen will be adding and editing some of her posts to include new hints and tutorials. Keep in mind that everything she writes about Scrivener version 1 will also apply to version 2. Check out her Scrivener posts at:
Wednesday, November 3, 2010
Five Essentials Tutorial
On November 1 Scrivener 2 for the Mac was released. Currently Scrivener for Windows is under development and will likely be released in January or February of 2011.
Several faculty in the School of Education are getting Scrivener and I've created a tutorial mainly for them, but anyone is welcome to download and use this tutorial. The tutorial covers, at least for me, the five essential features you want to know about Scrivener. In essence this tutorial presents why someone would use Scrivener rather than being a how to tutorial.
Perhaps the most important concept to understand is that Scrivener creates a writing environment rather than being simply "writing software." The distinction is important and I think becomes clear once you've viewed the tutorial.
Here are the five big areas covered:
Realistically there are several other important features about Scrivener—and what I list as the big five may not be the same for everyone. However, this 22 minute tutorial does provide a decent overview for academics wanting to get started with Scrivener. The download is about 135 Mb, and the movie will play fine on your iPad (sync via iTunes) as well as your computer.
Several faculty in the School of Education are getting Scrivener and I've created a tutorial mainly for them, but anyone is welcome to download and use this tutorial. The tutorial covers, at least for me, the five essential features you want to know about Scrivener. In essence this tutorial presents why someone would use Scrivener rather than being a how to tutorial.
Perhaps the most important concept to understand is that Scrivener creates a writing environment rather than being simply "writing software." The distinction is important and I think becomes clear once you've viewed the tutorial.
Here are the five big areas covered:
- Chunking
- Organizational Flexibility
- Integrated Research
- Compiling (Exporting)
- Meta-Data
Tuesday, November 2, 2010
David Hockney on Painting
I ran across a recent article about David Hockney using the iPad for his recent drawings. In fact, at a new exhibition in Paris all the drawings are displayed on a series of iPads. Check out the full story:
Monday, November 1, 2010
Writers on Scrivener
Not sure if Scrivener is a useful writing tool? Then check out the Scrivener webpage that contains only testimonials from published authors. It's a long, impressive, and passionate set of praise.
When reading these short pithy testimonials keep in mind that the writers are referring to first version of Scrivener. The second version of Scrivener is a major upgrade and insanely more impressive.
When reading these short pithy testimonials keep in mind that the writers are referring to first version of Scrivener. The second version of Scrivener is a major upgrade and insanely more impressive.
Scrivener and Meta-Data
One of the very powerful and enhanced features in Scrivener 2.0 is how it handles meta-data. There are actually two categories of "meta-data" in Scrivener: ordinary meta-data (such as keywords, labels, and much more) plus custom meta-data. The link below provides a very short introduction to custom meta-data in the Scrivener writing environment:
Three Reviews of Scrivener
I'm posting links to three reviews of Scrivener. Two of these reviews are specifically aimed at people doing non-fiction or research writing. The first link looks at Scrivener for academic writing.
This second post is a review of Scrivener published in the Chronicle of Higher Education. It was written in March 2010 so it does not address the new features included in the 2.0 release.
The third post is simply titled, "Scrivener might Change Your Life." Check it out:
This second post is a review of Scrivener published in the Chronicle of Higher Education. It was written in March 2010 so it does not address the new features included in the 2.0 release.
The third post is simply titled, "Scrivener might Change Your Life." Check it out:
Tuesday, October 26, 2010
Scrivener 2 Preview
Scrivener, the wonderful writing software program, had the very big 2.0 release yesterday. To be fair, it wasn't a final release but a pre-release so those participating in NaNoWriMo (National Novel Writing Month) have a version to use now through December 7th.
The final version, with a full set of project templates, will be released on November 1st.
Just as exciting as this pre-release of version 2, is that there is now a early beta version available for Windows users!
I've only played around with version 2 for about an hour, but the improvements are really fantastic. This was already first class software, but the new enhancements make this an amazing writing environment for storytellers or researchers or teachers. Check it out:
Monday, October 25, 2010
OmniFocus: 2 More Reviews
OmniFocus is a great software product for getting things done. I've posted about OmniFocus previously (see earlier posts). However, I wanted to share two recent, and very thorough, reviews of the OmniFocus product. This product is available for Mac computers, iPhones, and iPads.
The first post is titled: How I Use OmniFocus to Organize My Life. Check out the post here:
The second post is titled: A Sledgehammer Called OmniFocus. The author, Shawn Blanc, nicely covers alternatives to OmniFocus as well in his article. Check out the post here:
The first post is titled: How I Use OmniFocus to Organize My Life. Check out the post here:
The second post is titled: A Sledgehammer Called OmniFocus. The author, Shawn Blanc, nicely covers alternatives to OmniFocus as well in his article. Check out the post here:
Saturday, October 23, 2010
OmniGraffle for the iPad
OmniGraffle is a great Mac-only software program for creating visual models. In the recent past OmniGroup released OmniGraffle for the iPad, and just a few days ago Wired Educator published a review of this app. This is a short, but important, read for those of you potentially interested in creating visual models or graphic organizers. Since OmniGraffle for the iPad has VGA support, it can be used not just for creating or showing visual models, but also to create ones live in the moment. Here's the link to their review:
Thursday, October 21, 2010
Multimedia Scaffolding
On Wednesday I presented a second paper at the e-Learn Conference titled: Multimedia Scaffolding for Reading Research. The presentation is 21 minutes long. Here's a short description:
If you would like to download the presentation (and short accompanying paper) you can do so by using the link below. This movie will play on your computer, but you can also play on your iPad. To put onto your iPad you'll need to download, add to your iTunes library, then sync with your iPad.
Beginning doctoral students in education often experience great difficulties in reading and understanding original research articles. This presentation will provide an example of one multimedia instructional approach intended to help students become more efficient and savvier readers of original research. The multimedia treatment is named a “research aloud.” More generally this presentation focuses on multimedia learning tools for helping students deal with very difficult conceptual material across a wide range of subject matter. The basic idea is to leverage the advantages of multimedia to scaffold student learning in a domain that is typically difficult for a defined set of learners.
If you would like to download the presentation (and short accompanying paper) you can do so by using the link below. This movie will play on your computer, but you can also play on your iPad. To put onto your iPad you'll need to download, add to your iTunes library, then sync with your iPad.
Tuesday, October 19, 2010
Pre-Training in Statistics
I'm currently in Orlando, Florida at the e-Learn Conference. Today I made a presentation titled: Multimedia for Pre-Training in Statistics . This was the first time I had pre-done my presentation: it was shown using my iPad via the Video app. The presentation is 15 minutes long (which allowed 5 minutes for questions at the end). Here's a short description of the presentation:
If you would like to download the presentation (and short accompanying paper) you can do so by using the link below. This movie will play on your computer, but you can also play on your iPad. To put onto your iPad you'll need to download, add to your iTunes library, then sync with your iPad.
This presentation will demonstrate one specific use of multimedia screencasts: as pre-training, and review, of essential concepts in statistics. Each of the 12 screencasts will be less than 5 minutes in length. Their purpose is not to cover a topic in depth but to highlight either: (a) key conceptual issues or (b) key calculation steps. The presentation will provide a live example of one of these screencasts plus discuss the rationale and development of the entire set of multimedia screencasts.
If you would like to download the presentation (and short accompanying paper) you can do so by using the link below. This movie will play on your computer, but you can also play on your iPad. To put onto your iPad you'll need to download, add to your iTunes library, then sync with your iPad.
Index Card
Last week I wrote about CarbonFin Outliner, a very nice writing program that combines being an outliner program, with online web storage and sharing, and can be integrated into a workflow using a regular outliner on your computer or with Scrivener. This week I want to sing the praises of Index Card. This is also a writing program, with a focus on structure.
Index Card is created by DenVog. It provides two key views: index cards (natch) and outline view. This is not a dedicated outliner, so it only has one level (no indents, numbering, etc.) to the outline view. One great feature to this program is you can easily switch back and forth between index card view and outline view—this has many positive advantages if you are starting to write about something.

The final product in Index Card is an RTF (rich text format) file that can be opened by any word processor. You can also export in its native "index card" format if you wish to share a project with another person using an iPad. Like several other programs these days it integrates with Dropbox for syncing your work.
Index Card is more of a writing program (relative to CarbonFin Outliner), but its ability to change structure is still one of its most important features. As with physical index cards, on your iPad screen you can move around your virtual index cards as much as you want. In addition, you can "label" your index cards (using one of eight colors). In turn this makes is easy to create added structure to your project. The combination of moving around index cards, plus using labels, can be very powerful and intuitive for creating a structure to a new writing project.
As with typical note cards, each card has a title, but also you can write content on the card. This content need not be limited to the size of the card. The titles of cards get exported as "headers" in an RTF file, and the notes get exported as text under a specific header. The latest version of Index Cards adds the ability to write "secret" notes on the back of the card. In turn these secret notes on the back of a card do not get exported with the final RTF document.
The developer of Index Card is working with the developer of Scrivener to develop even better integration between these two programs. I don't know what form this integration will take, but for Scrivener users this is great news.
At $2.99, Index Card is a very affordable and handy writing app for the iPad. It's great for developing the initial structure for a new document (via cards that get turned into headers) as well as the initial writing that can easily be done in a chunked manner (i.e. card-specific associated text). And you can share the results of your work easily with other people, or regular computer programs, through the RTF export option. This is a nicely designed app that works smoothly, and the developer seems to be constantly working on new upgrades. A great tool to have on your iPad. Check it all out at:
Index Card is created by DenVog. It provides two key views: index cards (natch) and outline view. This is not a dedicated outliner, so it only has one level (no indents, numbering, etc.) to the outline view. One great feature to this program is you can easily switch back and forth between index card view and outline view—this has many positive advantages if you are starting to write about something.
The final product in Index Card is an RTF (rich text format) file that can be opened by any word processor. You can also export in its native "index card" format if you wish to share a project with another person using an iPad. Like several other programs these days it integrates with Dropbox for syncing your work.
Index Card is more of a writing program (relative to CarbonFin Outliner), but its ability to change structure is still one of its most important features. As with physical index cards, on your iPad screen you can move around your virtual index cards as much as you want. In addition, you can "label" your index cards (using one of eight colors). In turn this makes is easy to create added structure to your project. The combination of moving around index cards, plus using labels, can be very powerful and intuitive for creating a structure to a new writing project.
As with typical note cards, each card has a title, but also you can write content on the card. This content need not be limited to the size of the card. The titles of cards get exported as "headers" in an RTF file, and the notes get exported as text under a specific header. The latest version of Index Cards adds the ability to write "secret" notes on the back of the card. In turn these secret notes on the back of a card do not get exported with the final RTF document.
The developer of Index Card is working with the developer of Scrivener to develop even better integration between these two programs. I don't know what form this integration will take, but for Scrivener users this is great news.
At $2.99, Index Card is a very affordable and handy writing app for the iPad. It's great for developing the initial structure for a new document (via cards that get turned into headers) as well as the initial writing that can easily be done in a chunked manner (i.e. card-specific associated text). And you can share the results of your work easily with other people, or regular computer programs, through the RTF export option. This is a nicely designed app that works smoothly, and the developer seems to be constantly working on new upgrades. A great tool to have on your iPad. Check it all out at:
Thursday, October 14, 2010
CarbonFin Outliner
The apps I like the least for the iPad are those that are writing intensive. I've already got perfectly good tools for that: fantastic software on my desktop and laptop computers. The iPad seems ill suited for sustained writing. However, I've discovered a couple of apps that are great for shorter writing aimed at brainstorming or providing a structure. One of them is named Carbon Fin Outliner. The other is Index Card and I'll write about it at a later time. A quick look at the CarbonFin Outliner screen is provided below.

CarbonFin Outliner is, well, an outlining program. The structure is simple, but the tools are very effective. You can have multiple indented rows to your outline. Outline bullet points can have notes associated with them. It's easy to navigate the outline structure. You can collapse, and expand, outline rows. It's easy to rearrange, or reorder, rows.
Besides the basics of outlining, done well, CarbonFin Outliner offers some important additional tools. First, your outlines can be synced to a web-based server that CarbonFine provides (for free). All you have to do is tap an icon in the Outliner for iPad app and all your outlines are synced (and backed up) to the web. You can collaboratively share your outline with others—they would be given a link to your web-stored outline. They can make changes and when you press sync again on your iPad you'll be automatically updated on the iPad with your collaborator's changes.
Outlines can be exported as OPML files. This is a very generic format for outlines that many programs on both Macs and Windows can read. CarbonFin recommends using OmniOutliner for the Mac (a great program) and Bonsai for Windows. Thus I can create the beginning of an outline on my iPad and then later refine and expand it on my Mac easily enough. By the way, as long as your computer outlining program will export as OPML (and it should) then you can go the other direction also: create an outline on your computer, export/import, and then expand/refine the outline on your iPad or share for collaboration via CarbonFin's Outliner Online free service.
For some the most important feature is that CarbonFin Outliner's OPML exports are readable by the wonderful Scrivener writing software. These OPML files get imported into Scrivener as new folders and files. Notes for items get imported as the text for a particular file or folder. Thus CarbonFin is a great way to start a writing project in Scrivener as well.
In addition, CarbonFin allows you to easily add numbers (and sub-numbering) to your outlines, show a completion task-box for items (great for to-do lists and other things), and many other helpful options.
In the ten days I've had Outliner it has become one of the two most used content-creation apps on my iPad (the other is OmniFocus which I use all the time). The price is about $5. For more information, check out the details at:
Zotero Making Exciting Updates
Zotero is the wonderful web-based software that allows people to very easily collect references from online databases such as ERIC and PsychInfo. For students and academics Zotero is a free and great resource for collecting, organizing, and exporting references that can be easily imported when using an online database such as PsychInfo.
The downside to Zotero has been that it only works with the FireFox web browser. All of that is about to change. The developers are working hard at creating plugins that work with Google Chrome (Win and Mac) and Safari (Mac). Moreover, they are creating a standalone version of Zotero!
To find out more about upcoming updates to Zotero, check out this article:
Friday, October 1, 2010
Big iPad App Release Day
It turns out that two major apps were upgraded or released today for the iPad: GoodReader had a major update (to version 3) and MacJournal for the iPad was released.
GoodReader is an inexpensive PDF reader for the iPad (and iPhone). It excels in many ways, but it's especially known for how well it handles large PDFs easily. It connects to several services for importing your PDFs including the must-have DropBox. It's a perfect PDF app in all ways except one: it did not have the ability to annotate PDFs. Instead you'd have to buy an application such as iAnnotate PDF to do annotations. (BTW, iAnnotate PDF is also a solid app.) Today version 3 of GoodReader was released and the major new feature: the ability to annotate PDFs!!!!!!!!
I've played around with version 3 a bit today, and it seems that way you add annotations is very easy and does not interrupt the flow of reading. The part that was unintuitive for me is how to change the icon for a note, or the color for a circle, line, or other figure. It turns out you simply draw in the default note, line, or object. Then when done, single-press on the new object and additional options come up for colors, type of icon and so forth. So actually doing everything I want with annotations is quite easy, but it wasn't obvious (to me) how to refine the look of a particular annotation at first.
MacJournal for the iPad is only a good option if you already use the wonderful Mac application MacJournal. MacJournal is a very solid software product that allows you to have multiple "journals" within one database. This is a very good program for integrating your various notes, letters, and other short writing into one place. In addition, MacJournal allows you to post new entries to a blog. The beauty of MacJournal for the iPad is now you can have all your MacJournal stuff on the Mac synced to your iPad. This can be incredibly useful if you have a large number of notes that you want to refer to via your iPad. You can easily create new entries using the iPad app also. So, if you're already a MacJournal user (or will be in the near future) then you'll definitely want to consider complementing the regular software with the iPad app. Definitely worth the $5.99 investment.
MacJournal and the iPad
Today one of my favorite applications on the Mac, MacJournal, released the iPad version of their app. So far it seems to work really well. One of the things that MacJournal will do is to allow you to create simple blog posts. (Note: MJ is not as full featured for blog posts as an app like MarsEdit.)
In fact, this simple post is being written and sent from my iPad! I will write more about MacJournal on the iPad once I have taken it through a few paces.
In fact, this simple post is being written and sent from my iPad! I will write more about MacJournal on the iPad once I have taken it through a few paces.
Saturday, September 25, 2010
Paris Summer 2010 Presentation
You can download the multimedia presentation (210 Mb) using images taken in Paris this past summer. The movie is 14 minutes long. This presentation integrates images with street sounds recorded primarily with my Sony PCM-M10 audio recorder.
There were two things I was most excited about with this new presentation: (1) the inclusion of live sound snippets (rather than commercial music) seems to work better (to me anyways), and (2) creating a multimedia presentation that plays well on the new Apple iPads. See the sidebar for help on getting this movie transferred to your iPad (if you have one).
There were two things I was most excited about with this new presentation: (1) the inclusion of live sound snippets (rather than commercial music) seems to work better (to me anyways), and (2) creating a multimedia presentation that plays well on the new Apple iPads. See the sidebar for help on getting this movie transferred to your iPad (if you have one).
Saturday, September 18, 2010
iTunes Rocks the iPad
I quickly found that there's a lot that I want to do with the iPad that I can't do if I don't know how to use the free iTunes software to sync between my "pad" and my computer. You can probably get around just fine with transferring documents such as PDFs without knowing a lick about iTunes. But it really helps if you become iTunes savvy if you want to fully maximize using photos, music, and videos.
About a month ago I created a 14 minute movie that goes over various aspects of why and how you'd want to use iTunes. You can download that 85 Mb movie here:
I have a lot of documents I work with on my 16 Gb iPad but documents currently account for only 0.4 Gb of my available space. Photos and audio currently take up 1 Gb of space, and videos are taking up 10 Gb of space. You can see that in my case I'd want to be able to get photos, music, and video easily on and off my iPad so I could look, listen, view a variety of things. On the other hand, if you only have documents on your iPad there's a big, big, big chance you're not really using the device to its full and beautiful capacity.
To me the iPad, at heart, is a fantastic multimedia device. Documents (with annotations and more) are a bonus, but multimedia (lights, cameras, action!) are the heart of the power of this small dynamo.
Of course the other alternative is to rely on choppy YouTube videos. You know what I mean: watch 30 sections, wait a minute, watch 30 more seconds, wait another minute. That's soooo 1990s. And those videos are generally not great quality. But with a bit of knowledge you can get full beautiful videos on your iPad that play flawlessly since you're not relying on an internet connection. In fact, once you learn how to use iTunes with your iPad, you can put the movie I created on your iPad for easy review in the future (hint: it comes with chapters so you can easily go to specific sections if you want).
Monday, September 13, 2010
Scrivener 2 Coming Soon
Keith Blount (developer of Scrivener) has just posted some more news—specifically about the new features in version 2. This is a must read post, though parts may not make a lot of sense if you haven't already started using Scrivener version 1.
If you are a faculty member in the SOE you should download a trial version of Scrivener 1. It lasts for 30 days of usage (real usage, if you use 3 days a week then it will last 30 weeks).
In this post Keith officially announces that Scrivener 2 will be released in late October, and that all copies of Scrivener bought on August 1 or later will be able to upgrade for free to version 2.
Check out the full post here:
Saturday, September 11, 2010
ScreenFlow 2 Update
Recently I wrote about the wonderful ScreenFlow software program for doing recordings of what's on your screen to create screencasts. One of the best features of ScreenFlow is the editing environment after you've recorded what's on your screen. In addition, ScreenFlow is great for making different sorts of multimedia products. For example, you can add still images, other video (e.g. from a Flip camera), and other audio to your original screen capture product.
However, what if you want to use ScreenFlow for creating multimedia where you don't need any screen capture video? Does it still work well? The answer is yes! There is a trick to get this to work easily—the trick is needed because when you start up ScreenFlow it will assume you want to start recording a new screen capture. You can close this recording window, but you have no way to start off with a blank project. That's where having a template comes in handy! I recently created a ScreenFlow project template that I named "ScreenFlow 1024 Template." This just tells me the size of the template is 1024 x 768 pixels. When I open it up there's only one media element in it: a Photoshop document of a scanned image. I can now easily add other media elements: audio, video, images. I can also easily delete the one starter image. Voila, now I have a very quick way to start a new multimedia project in ScreenFlow without having to take a bunch of extra steps.
Except for projects that involve a large number of images (40 or more), I'll likely be using ScreenFlow for all my multimedia projects now. (For those projects with large number of images I'll use FotoMagico Pro as it handles them better.) If you'd like a copy of my template, send me an email and I'll provide a link so you can download it. Of course, you'll need to have ScreenFlow itself installed on your Mac computer!
Friday, September 3, 2010
OmniFocus for iPad
OmniFocus for iPad may be the killer app out there right now for padders. That said, it helps a lot if you also use a Mac, perhaps even an iPhone, so all your stuff gets synced up nicely.
OmniFocus is one of the applications that works under the getting things done approach. Put more simply, it's a task management or "to do" software. I've used OmniFocus on my Mac and iPhone for over a year now, and together that made a visible impact on how productive I am. I never forget the "big stuff" (at least "big" to me), but the problem is forgetting the small stuff that's so very important.
This software product is $40, clearly at the high range for iPad apps. But I wouldn't think twice about buying it again now that I've had it for over a month. It is the app that I use the most on my iPad—and I use my iPad quite a lot these days.
There's really no reason for me to write another review of the OmniFocus app since others have already done that work so well. I highly encourage you to check out some of these reviews so you can see for yourself what the software does and how it accomplishes its objective so elegantly.
One review that contains lots of pictures (very helpful) was written at MacSparky shortly after the release of this app:
A shorter review, but still very useful, was written by Franklin Tessler for MacWorld:
A third review is provided at 148 Apps:
Finally, a final review that includes a YouTube video is provided at TiPb:
Beyond the reviews of the iPad app itself, perhaps the most important article you can read is titled The Psychology of OmniFocus written by Ryan Norbauer in December 2009. The reason you would want to buy this software (Mac, iPhone, or iPad version) becomes apparent when you read Ryan's article.
Tuesday, August 31, 2010
SimpleNote
SimpleNote is probably my favorite app on the iPad. Sure, it's free, but that's not why I love it. It only allows you to make, and store, simple notes without any formatting (bold, italics, and the like). So why all the likey? It has always been a good app, but last week they released version 2 which adds important new and powerful features.

For $5 you can remove ads. For $12 per year you can upgrade to their premium package which removes ads, offers 30 backup versions of notes, allows you to create notes by email, and allows you to create an RSS feed for your notes. I'm still on the fence about whether I'll upgrade to premium. My guess is I will, but I want to give the new free version 2 a month or so of usage before I make a final decision.
Syncronicity
The ultimate in smooth automatic syncing is the key to SimpleNote's beauty. If you are a Mac or Windows user you can find free (or low cost) software that "talks" to SimpleNote. So what? Currently I have all my notes automatically synced in 5 places: iPad, iPhone, Mac at office, Mac at home, and on the SimpleNote website. This automatic syncing, in and of itself, makes SimpleNote a thing of beauty. Visit the SimpleNote downloads page to learn more about other software programs that "play nice" with SimpleNote on a Mac, Windows, Palm, or Android systems.Tags
Version 1 had no tags or folder system. Simply a long list of note titles. It wasn't impossible to find notes if you had a lot of them, but it was a bit of a struggle. With their new tag system it is super easy to categorize notes and subsequently find them for later viewing. Right now the tags only sync to SimpleNote on the web, iPad and iPhone. I imagine some of the outside developers will rework their software for Mac/Windows so that those software programs also recognize the SimpleNote tags. In the screenshot (above) it shows what it looks like when I've chosen the tag "multimedia": the result is I see only the 5 notes having that tag plus a small advert at the top.Live Sharing
For educators this feature has mucho potential. If you activate sharing for a specific note then SimpleNote provides you with a web address where the sharing takes place. Email this web address with whomever you like. In real time multiple people can make changes to the "note" and the results, once again, are automatically synced across all your devices! When done with the "sharing session" then turn off the share option for that note. Why is this potentially important? There are likely many benefits including live online discussions between students, collaborative editing of text documents by a group, live updated class notes where the notetaking responsibility is distributed across several students in a class session, and many more options. Sharing may be the most important new feature in SimpleNote.Create Web Pages
An alternative to sharing is to create a web page. This is somewhat akin to the sharing option in that SimpleNote will automatically give you a web page location where others can see a specific note. However, using this option others can not make changes to the text. On the other hand, you can continue to make changes to the note and the webpage will be automatically updated. Very nice.Full Screen
This is a very nice option. In the lower right corner of your iPad/iPhone screen is a grey icon for viewing an individual note full screen. Tapping this icon hides the ad, the list of other notes using the same tag, and the top toolbar. Very nice for reading longer notes.Summing Up
I'm sure there are other features of SimpleNote that I'm ignoring at the moment—but this app is certainly worth exploring on your own. You'll need to open a free SimpleNote account at their website. You'll also need to download the free SimpleNote apps for iPad and iPhone using the relevant App Store. The regular free version comes with some limitations: including ads which are shown on part of the SimpleNote screen.For $5 you can remove ads. For $12 per year you can upgrade to their premium package which removes ads, offers 30 backup versions of notes, allows you to create notes by email, and allows you to create an RSS feed for your notes. I'm still on the fence about whether I'll upgrade to premium. My guess is I will, but I want to give the new free version 2 a month or so of usage before I make a final decision.
Sunday, August 29, 2010
ScreenFlow 2
There are two main multimedia creation tools I use on my Mac: FotoMagico Pro and ScreenFlow. There are some overlaps between these two great programs. FotoMagico Pro is better at handling multimedia created out of lots of still images. You can also add audio and video, but the focus with FotoMagico is using still images. On the other hand, ScreenFlow is primarily a screen video recording program that has powerful editing abilities. If you are primarily shooting video of what's on your computer screen, or want to bring in video from other sources (such as Flip cameras and the such), then ScreenFlow is likely the best choice of these two applications.
You can download a screencast (i.e. a movie that shows what's on my computer screen as I go through various tasks) to see a practical example of a ScreenFlow production. In this case I shot a Keynote presentation combined with live audio. Later I edited the audio and video as warranted. The movie is 11 minutes long, is a 24 Mb download, and works beautifully on an iPad (as well as a computer).
ScreenFlow version 1 was a solid release, but with version 2 they have added important features that make editing and finishing your movie easier and better. The software will record what's on your screen, plus record your audio input, plus record the video from your iSight camera (if you have one) into one integrated recording. Once done recording you are taken to the ScreenFlow editing area where you do the regular stuff (delete, copy, and so forth). However the editing environment also allows you to do many additional procedures very easily. This includes swapping the computer cursor for a custom cursor (I like a big red arrow), adding text titles or descriptions where you want, creating chapters, easily adding transitions between movie clips, creating focus effects through features like magnifying towards one part of the screen, plus many other special editing options.
Years ago SnapzPro was the best screen recording program on the Mac. But the company that makes SnapzPro has not updated their software in a long time. Camtasia Studio on Windows is a wonderful program, but their sister app—Camtasia for the Mac—is not nearly as powerful or reliable as the Windows counterpart. That leaves ScreenFlow as the best application for creating cleanly edited movies on your Mac—especially when the main focus of the movie is on capturing what's happening on the computer screen. ScreenFlow is powerful enough to be a great multimedia glue application that combines video, still images, and audio even if you don't record any video of your screen! An über-powerful program like Final Cut Pro might be better, but ScreenFlow is much cheaper ($99, $90 for academics) and much easier to master relative to Final Cut Pro.
A search via the web will bring up many good reviews of ScreenFlow 2. However, some of these reviews have been collated on one page:
If you are considering making multimedia movies that play well on Windows, Macs, and iPads then you'll want to strongly consider ScreenFlow if you're a Mac-user.
Sunday, August 22, 2010
Compass Stand

The iPad is so sleek and mobile that I wanted to find a stand that was equally sleek and mobile. Not easy. Some great stands out there, but the ones I initially saw either weren't sturdy or weren't very mobile. Then I discovered the compass stand made by TwelveSouth. The perfect stand as it works as both a display stand (vertical) or as a typing stand (slightly elevated). It's very small, solid, and comes with a convenient small sized holder to protect it. Check it out:
Monday, August 16, 2010
Reeder for iPad
I've never really taken advantage of RSS feeds before. The software options I found for collating these feeds I didn't like very much. And Google Reader, though very functional, is also über-ugly. All that changed with my new iPad.
Reeder is a very simple application that works seamlessly with Google Reader. Now I have the great functionality of the web-based Google product combined with an ultra-portable and relaxing RSS reader on my iPad.
What's the advantage of using RSS (or Really Simple Syndication)? It means the news comes to you, instead of you going to the news. Imagine you visit 20 different websites for news about various things. Imagine you visit another 20 once in a long while since they don't update their blogs very often. You now have 40 sites to visit. If they all offer RSS feeds (and they probably do) then all 40 of them can be collated into one viewing experience on Reeder.

Reeder plays well with Google Reader and its use of folders. So, you may have a folder for "World News" and another for "iPad News" as an example. You can then organize your various RSS feeds into these folders—and in turn this makes it easier to find and view blog posts in a specific category.

I'm providing a link to a review of Reeder for iPad. If you decide to buy, keep in mind that there are two separate apps made by the same developer: Reeder and Reeder for iPad. Be very sure to get the iPad version.
Reeder is a very simple application that works seamlessly with Google Reader. Now I have the great functionality of the web-based Google product combined with an ultra-portable and relaxing RSS reader on my iPad.
What's the advantage of using RSS (or Really Simple Syndication)? It means the news comes to you, instead of you going to the news. Imagine you visit 20 different websites for news about various things. Imagine you visit another 20 once in a long while since they don't update their blogs very often. You now have 40 sites to visit. If they all offer RSS feeds (and they probably do) then all 40 of them can be collated into one viewing experience on Reeder.
Reeder plays well with Google Reader and its use of folders. So, you may have a folder for "World News" and another for "iPad News" as an example. You can then organize your various RSS feeds into these folders—and in turn this makes it easier to find and view blog posts in a specific category.
I'm providing a link to a review of Reeder for iPad. If you decide to buy, keep in mind that there are two separate apps made by the same developer: Reeder and Reeder for iPad. Be very sure to get the iPad version.
Sunday, August 15, 2010
Scrivener Updates
The wonderful (and inexpensive) writing software Scrivener will soon be moving into version 2. This will be a paid upgrade and the best estimate is that it will be released sometime in October. In addition there seems to be an imminent announcement about Scrivener for Windows (currently it's a Mac-only product). So, perhaps sometime in 2011 this product will be cross-platform.
Recently the developer (Keith) wrote a long-ish essay on what Scrivener 2.0 won't do. Check it out here:
Finally, I ran across a review of Scrivener at ProfHacker written in March 2010. It's a very thorough review and covers a lot of details relevant to those who work in academia:
Recently the developer (Keith) wrote a long-ish essay on what Scrivener 2.0 won't do. Check it out here:
Finally, I ran across a review of Scrivener at ProfHacker written in March 2010. It's a very thorough review and covers a lot of details relevant to those who work in academia:
Brent's Personal VisiCalc moment
Brent Simmons (a Mac software developer) recently wrote a short post about the iPad:
Every successful computing platform has to have a “VisiCalc moment” — the moment it goes from fun toy and technology demo to “holy crap this thing is useful.”
For the Apple II Plus that moment came the first time people saw VisiCalc. Imagine never having seen a spreadsheet on a computer — imagine always having done that stuff by hand. Then, for the first time, you enter some numbers and formulas into a computer and watch it calculate. Then edit some numbers and watch it recalculate. Pure magic. PFM.
I don’t think there’s a single VisiCalc moment that everyone will have for the iPad — but, for me personally, it was OmniFocus. That’s when my iPad went from toy to indispensable tool (oh, but still a fun toy, too).
Before OmniFocus, my iPad wandered around my desks without a real place. Now it has a place right next to my dev machine’s keyboard.
Scrivener Updates
The wonderful (and inexpensive) writing software Scrivener will soon be moving into version 2. This will be a paid upgrade and the best estimate is that it will be released sometime in October. In addition there seems to be an imminent announcement about Scrivener for Windows (currently it's a Mac-only product). So, perhaps sometime in 2011 this product will be cross-platform.
Recently the developer (Keith) wrote a long-ish essay on what Scrivener 2.0 won't do. Check it out here:
Finally, I ran across a review of Scrivener at ProfHacker written in March 2010. It's a very thorough review and covers a lot of details relevant to those who work in academia:
Recently the developer (Keith) wrote a long-ish essay on what Scrivener 2.0 won't do. Check it out here:
Finally, I ran across a review of Scrivener at ProfHacker written in March 2010. It's a very thorough review and covers a lot of details relevant to those who work in academia:
Wednesday, August 11, 2010
OmniFocus for Getting Things Done
Over the past two years there has been a great influx of Getting Things Done applications—some software based, some web based. While all of these options are dressed up "to do lists, they typically offer many more features than a simple checklist. If you're a Mac-user the most complete solution is called OmniFocus and is made by OmniGroup (makers of OmniOutliner and OmniGraffle).
OmniFocus comes in a Mac form, iPhone form, and just lately an iPad form. The good folks at appstorm just published a very good review of OmniFocus for the iPad. If you're interested at all in being more productive, it's certainly worth your time to read their very complete review.
OmniFocus comes in a Mac form, iPhone form, and just lately an iPad form. The good folks at appstorm just published a very good review of OmniFocus for the iPad. If you're interested at all in being more productive, it's certainly worth your time to read their very complete review.
Tuesday, April 27, 2010
Scrivener and Writing
Scrivener is a Mac-only software product that is fantastic for constructing more complicated writing products such as novels, dissertations, research articles and more. The product was created by Keith Blount who lives in the Cornwall region of England. Scrivener is both inexpensive ($40) and powerful. Currently it is at version 1.5.4 with a major upgrade (2.0) due around June/July/August. The 2.0 version will be a paid $20 upgrade.
If you are a School of Education faculty member (who uses a Mac), you already know the good news: you'll be able to get a free version of Scrivener sometime over the next few months. If you're simply a Mac-user, the still-good-news is it only costs $40 to get your own copy. If you're a Windows-user, we feel your pain, but a program that is somewhat similar (and is recommended by Keith Blount) is PageFour.
I love the Scrivener software program, but instead of me writing a review I wanted to provide links to others who have already written thoughtful and complete reviews of this product.
First, check out Julia Altermann's review at AppStorm and published on March 12, 2010. This is a very thorough introduction to Scrivener:
An older, but still useful and funny, review was written by Merlin Mann in 2007:
There are plenty of other reviews out there in addition to the two I posted. If you're a Mac-user and do intensive or more complicated writing, then do yourself a favor and check out the Literature & Latte website (Keith's name for the company that makes Scrivener):
Monday, April 26, 2010
Transcribing with Scribe
I've had dreams about software that would magically transcribe audio into written text. No more tedious manual transcribing that takes hours on end! Easy conversion of spoken presentations into text documents! Alas it was a dream without an anchor in reality. However, now that "dream" is starting to become a reality.
This is a very quick review of a new Mac software program named MacSpeech Scribe. Most software of this ilk works using a dictation model: talk into your computer and your voice gets converted into text or into a specific computer operations. There are several practical downsides to the dictation approach including:
Note that you can choose to do additional transcription training at any time to refine its capabilities. The vocabulary training and vocabulary editor options are very important—though I haven't used them yet. You can learn more about them by downloading the Scribe User Manual that I provide at the end of this post.
If you choose the Transcription button, then the next window you'll see is below. Before the window appears you will have been asked to supply an audio file. You can see the audio file ready to play at the bottom of the screenshot. Simply press on the Transcribe blue button and the software will begin the transcription process. It seems to take about a minute-to-two-minutes to process each minute of audio I've provided.
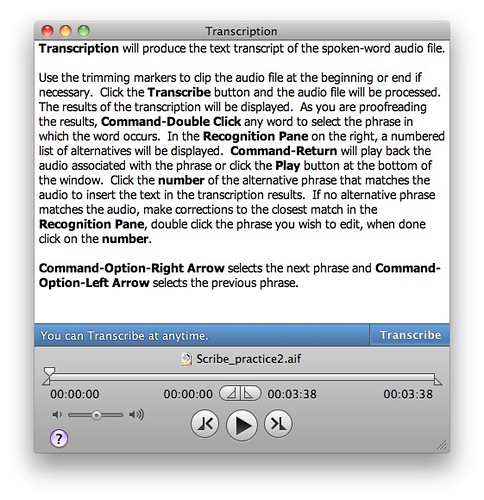
Below you see the results of the transcription process about half way through Scribe processing the entire file. You'll notice that I've created headers, periods, commas and other grammar by using simple spoken indicators during the recording process.
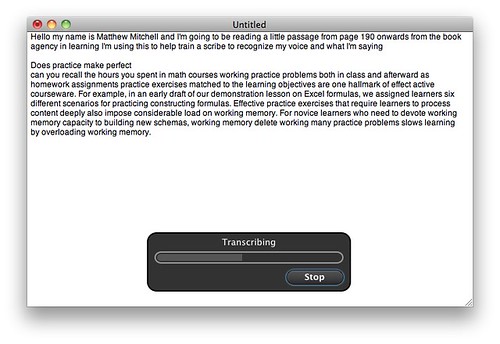
The final screenshot below shows a portion of the final transcribed audio. Notice that I'm currently on one specific "chunk" of audio (highlighted in yellow on the left side) and Scribe shows me it's best transcriptions on the right. In this case Scribe provides two possible alternatives. Don't remember what you exactly said? Not a problem, click on the Play button (bottom right side) to hear only that chunk of the audio. I can't emphasize enough what a brilliant feature this is. Even if I recorded someone else, and the transcription was only 60% accurate, this very detailed playback of discrete chunks of audio would make the transcription process much less painful and time-consuming for me.
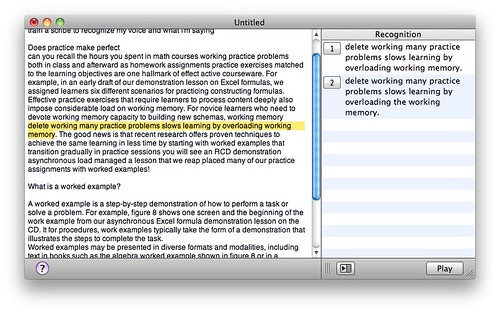
The biggest weak link in this product will be the quality of your audio recording. When doing research on this product it seemed reviewers either loved it or hated it. No one was in the middle. That indicated to me that the real "culprit" is the clarity and quality of the audio recording itself. My initial tests confirm that impression. Record in a quiet office with a good recording setup and you should expect great results (once there's been appropriate training). Record with a cheap portable recorder while in a busy and loud airport and you should expect much more modest results. To learn more about good portable recorders to buy, visit my previous post titled Getting Started with Audio Recorders.
Even if you have a less-than-optimal audio recorder, given the way the transcription editing process has been designed into the software, it seems creating transcripts from less than stellar recordings (or using multiple voices) will still end up being easier than the alternative of using transcribing machines, foot pedals, and the such. As a final note it seems the software only recognizes English right now. I'd guess that Spanish and other editions will be released sometime in the next year, but I'm not sure about that.
If you want to learn more then consider visiting the product website or download the user manual. Links to both are provided below.
This is a very quick review of a new Mac software program named MacSpeech Scribe. Most software of this ilk works using a dictation model: talk into your computer and your voice gets converted into text or into a specific computer operations. There are several practical downsides to the dictation approach including:
- Most dictation software needs to be hooked up with relatively cheap USB headsets—and often don't work well with better recording setups and not at all with non-computer portable recorders.
- The dictation is done live on the computer. This results in a lot of intensive computer activity. Put differently, dictation software is ripe for resulting in computer crashes—you lose not only the dictated text but also the audio recording. The result is you need to start all over again.
- Dictation software is pretty accurate, but not accurate enough to save loads of time. For example, with an accuracy rate of 90% (which is very good), you'll still need to do careful editing of your document. In the end you may not save time, or may end up spending more time, relative to just writing the normal way.
Critical Differences in the Scribe Approach
There are four critical differences relative to dictation software in the approach Scribe takes.- Scribe uses pre-recorded audio. This is very good for several reasons. First, even if your computer crashes then you still have the original recording to use. It means you can record in your office, at home, out in the jungles of Ecuador, or perhaps on the streets of Paris. This approach provides greater flexibility by separating the recording process from the transcription process.
- Scribe allows up to 6 profiles. You can train Scribe to recognize six different voice profiles. This can be very convenient. I can establish a profile for myself, another for my wife, and so on. There are a couple of key caveats here. If I record on my office recording system and then on my portable in-the-field recorder then I'll need two different profiles for myself. We tend to think that in both cases "our" voice has been recorded—but our voices will sound different enough in the two cases that differing profiles should be created. The second caveat is that transcription can happen only using one profile at a time. If a recorded conversation is used with Mary, Mark, and Mylene then you'll have to use a "best fitting" profile to use for these voices. As a result transcription results will be less successful.
- Scribe accuracy. I've done two relatively short tests (using a 2 minute audio and a 4 minute audio) and I already see that Scribe can quickly become quite accurate. I'd estimate that after only two training sessions Scribe is nearly 90% accurate with my voice. That's impressive. However, there are some key caveats. Quality of recording will make a big difference here. If you record into your computer's built in microphone, then don't expect great results. Over 50% for sure, probably close to 70% with adequate training, but computer mics are lousy. A good voice recorder will save you a lot of time in the long run. Invest money now in a good portable recorder, and save lots of time later if you want to use this type of software.
- Scribe flexibility. To me the major plus of Scribe is the flexibility and "smarts" it offers. Specifically here's what happens: it transcribes as best as it can, then it presents you with a double-paned window for you to review the transcription. Essentially your audio is divided up into "chunks." When you click on an area in the transcription, then the software's transcription for just that chunk shows up in the right hand pane. Most of the time you'll see 2 to 4 possible transcriptions for the chunk. You can choose the right transcription, or edit the nearest transcription for that chunk to make it exact. The magic is that Scribe allows you to play only the portion of the audio file related to each chunk of text. This means you don't need to madly sort through the audio recording to find out what you actually said!
Scribe Software Step-by-Step
When you start up Scribe for the first time you are forced to do an initial transcription training session. The software asks you to provide 2 minutes of audio to use. However, once you've completed the initial training, then when you start up Scribe you'll see the following window:Note that you can choose to do additional transcription training at any time to refine its capabilities. The vocabulary training and vocabulary editor options are very important—though I haven't used them yet. You can learn more about them by downloading the Scribe User Manual that I provide at the end of this post.
If you choose the Transcription button, then the next window you'll see is below. Before the window appears you will have been asked to supply an audio file. You can see the audio file ready to play at the bottom of the screenshot. Simply press on the Transcribe blue button and the software will begin the transcription process. It seems to take about a minute-to-two-minutes to process each minute of audio I've provided.
Below you see the results of the transcription process about half way through Scribe processing the entire file. You'll notice that I've created headers, periods, commas and other grammar by using simple spoken indicators during the recording process.
The final screenshot below shows a portion of the final transcribed audio. Notice that I'm currently on one specific "chunk" of audio (highlighted in yellow on the left side) and Scribe shows me it's best transcriptions on the right. In this case Scribe provides two possible alternatives. Don't remember what you exactly said? Not a problem, click on the Play button (bottom right side) to hear only that chunk of the audio. I can't emphasize enough what a brilliant feature this is. Even if I recorded someone else, and the transcription was only 60% accurate, this very detailed playback of discrete chunks of audio would make the transcription process much less painful and time-consuming for me.
Summary
Previously I had encouraged people not to buy dictation/transcription software. There were too many flaws in previous products. MacSpeech Scribe was released in March 2010 and offers very significant improvements over previous options. If you have the need, and pay attention to the caveats I mentioned earlier, this could be a great product to assist with either research or teaching. $150 is a very reasonable price given the power of this product.The biggest weak link in this product will be the quality of your audio recording. When doing research on this product it seemed reviewers either loved it or hated it. No one was in the middle. That indicated to me that the real "culprit" is the clarity and quality of the audio recording itself. My initial tests confirm that impression. Record in a quiet office with a good recording setup and you should expect great results (once there's been appropriate training). Record with a cheap portable recorder while in a busy and loud airport and you should expect much more modest results. To learn more about good portable recorders to buy, visit my previous post titled Getting Started with Audio Recorders.
Even if you have a less-than-optimal audio recorder, given the way the transcription editing process has been designed into the software, it seems creating transcripts from less than stellar recordings (or using multiple voices) will still end up being easier than the alternative of using transcribing machines, foot pedals, and the such. As a final note it seems the software only recognizes English right now. I'd guess that Spanish and other editions will be released sometime in the next year, but I'm not sure about that.
If you want to learn more then consider visiting the product website or download the user manual. Links to both are provided below.
Friday, April 9, 2010
Zotero-mania Sweeping the Nation
Zotero is the wonderful cross-platform web-based program for gathering and organizing references. And it's free! Well, that's not quite true as the "cost" of using Zotero is that you need to be using Firefox as your web browser in order for it to work. In my case this means I need to consciously switch from Safari to Firefox whenever I want to gather more bibliographic references into Zotero from my library's research databases, or Amazon, or other sources. If you have a dedicated bibliographic software program (such as Bookends or Endnote), Zotero can easily export information in a format that these other software programs can read.
Zotero has been around for almost two years, but relatively recently two things reminded me of this very powerful tool. First, Zotero has recently been upgraded to version 2. To find out how it works, and about its added features, check out the Zotero website.
Second, more and more organizations are using Zotero. (Well, why not? It's great!) Recently the Harvard Kennedy School of Government Library posted 4 short screencasts about how to use Zotero. It's worth checking out, especially as an introduction to the product. (Note: the Zotero site itself also provides some screencasts, but it's interesting to see how other organizations and libraries are embracing the goodness of Zotero.)
Once in awhile I get questions about how to create a bibliography (for a paper) directly from Zotero. I keep forgetting how to do this myself (as I don't use this feature often), so I thought it would be useful to provide a direct link to Zotero's website explaining how to create bibliographies without exporting to another program:
Monday, March 15, 2010
DevonThink Pro 2 & Annotations
The very powerful (Mac-only) software named DevonThink Pro was released on February 24th. This new version represents major advances over version 1 of the same product. Put simply, this is software for organizing and working with large amounts of information. Put differently, it's perfect for working with a large number of research articles (and thus is perfect for doctoral students and professors).
To find out more about this product, please read more at the DevonThink Pro website, you may especially want to look at the unique features webpage. The academic price for DevonThink Pro is $60, and the academic price for DevonThink Pro Office is $112. (The company offers an academic discount of 25% on all their products). You can see a comparison chart of the two. (Note: you won't want to buy the Personal or Note versions as they leave out too many power features.)
One of the new power features of this software is the ability to create annotations that are integrated with the research article (or any other document) of your choice. I've created a 9.5 minute screencast that takes your through both why and how to use this very exciting feature. If you're interested, download the DTP Annotations tutorial below:
Tuesday, March 2, 2010
Audio Recorders
I'm often asked by students about recommendations regarding audio recording equipment. These days there are lots of choices, but it still takes some care to make a really good choice. For a person who is considering getting into audio recording to create audiobooks, other presentations, provide feedback for their students, to conduct interviews, and a host of other spoken voice uses, I suggest buying one of the three products described below. Next, I'll give you a great website where you can buy most of this suggested equipment. Finally, I'll provide short hints about some more expensive, but noticeably higher quality, equipment.
You can buy equipment for less than $250, but these days my strong, strong recommendation is to spend at least $275 on equipment. This will give you much better quality, longer lasting equipment, and better ease of use relative to the cheaper options.
To learn more I suggest reading the review at Wingfield Audio about the Sony PCM-M10. There are some very nice non-audio features of this device. First, it has a tripod screw built into the backside. This means it's very easy to use any small tripod with this device—a real boon for those doing longer recordings. Second, it comes with a wired remote control—which can be very useful in some situations. Third, for Windows users, it comes with Sound Forge LE audio software for subsequent audio editing.
One key minus of the device is that it only records in stereo—for spoken voice recordings this means files are twice as large as they need to be. Thankfully you can convert stereo to mono easily enough in most audio editing software.
The Marantz has some advantages over the Sony. It has bigger and clearer buttons. For some this may make the recording experience simpler and more intuitive. For others it won't matter. The Marantz can be set to record in mono—a big plus over the Sony. Finally it seems the recording quality may be a bit higher with the Marantz. It's also more expensive and is currently priced at $399. I recommend reading the review at Wingfield Audio about the Marantz PMD620.
Overall, the Sony PCM-M10 is probably the best choice amongst these two devices for most people.
The MicPort Pro is essentially a small audio preamp that allows you to connect a microphone to your computer. (BTW, in all cases you need a preamp to raise the volume of your microphone's recorded audio.) There are competing devices, but this is by far the best option. It currently costs $150 (e.g. see the MicPort Pro at BSW). In addition you'll need a reliable microphone, and one that doesn't require a really strong preamp (none of these small devices have strong clean preamps). My suggestion is to spend $150 to get a small, high quality, microphone like the Audio-Technica AT8010 at Musician's Friend.
As you can see, this last option is also $300. However, you'll have to spend a wee bit more to get a tripod for the mic, and perhaps a 3-to-5 foot XLR cable to give yourself more flexibility when positioning the MicPort Pre and the microphone.
You can buy equipment for less than $250, but these days my strong, strong recommendation is to spend at least $275 on equipment. This will give you much better quality, longer lasting equipment, and better ease of use relative to the cheaper options.
Sony PCM-M10
This is a new recorder that was released around November 2009. This new device was born out of a legacy of excellence. While Sony makes a lot of middle-of-the-road equipment, their PCM-D1 recorder is legendary as a very portable, high quality, recorder of music. Alas, it costs about $1800. About two years ago they came out with the PCM-D50 which is also an excellent recorder, but was built using slightly cheaper parts and not built to quite the same high audio recording standards. And this new device costs about $500. So, for a great reduction in price, the consumer got a product that was about 80% as good. Quite a feat by Sony. Now they've take this one step further by creating the PCM-M10. At about $300 this device is noticeably smaller than the earlier ones (iPod size to be exact). It's probably not so good for recording music (relative to the pricier models) but it still very very good at recording spoken voice.To learn more I suggest reading the review at Wingfield Audio about the Sony PCM-M10. There are some very nice non-audio features of this device. First, it has a tripod screw built into the backside. This means it's very easy to use any small tripod with this device—a real boon for those doing longer recordings. Second, it comes with a wired remote control—which can be very useful in some situations. Third, for Windows users, it comes with Sound Forge LE audio software for subsequent audio editing.
One key minus of the device is that it only records in stereo—for spoken voice recordings this means files are twice as large as they need to be. Thankfully you can convert stereo to mono easily enough in most audio editing software.
Marantz PMD620
This recorder has been around about two years. It's almost as small as the Sony. It also does a great job of recording spoken voice. One of the problems most small devices have is that they use ultra-sensative mics. This means almost any movement results in distortion in the form of wind sounds being recorder. For some devices this is true even if walking in an office with still air! Both the Marantz and Sony devices are free of this problem (except for relatively large winds).The Marantz has some advantages over the Sony. It has bigger and clearer buttons. For some this may make the recording experience simpler and more intuitive. For others it won't matter. The Marantz can be set to record in mono—a big plus over the Sony. Finally it seems the recording quality may be a bit higher with the Marantz. It's also more expensive and is currently priced at $399. I recommend reading the review at Wingfield Audio about the Marantz PMD620.
Overall, the Sony PCM-M10 is probably the best choice amongst these two devices for most people.
MicPort Pro with AT8010 Microphone
This is a combination of two components that will allow you to record directly into your computer. This direct recording can have advantages, and disadvantages. In general, I'd recommend using one of the previously mentioned portable recorders. But if you're comfortable with computers (and generally taking care of your hard drive) then this may be a better solution, or a good complementary solution.The MicPort Pro is essentially a small audio preamp that allows you to connect a microphone to your computer. (BTW, in all cases you need a preamp to raise the volume of your microphone's recorded audio.) There are competing devices, but this is by far the best option. It currently costs $150 (e.g. see the MicPort Pro at BSW). In addition you'll need a reliable microphone, and one that doesn't require a really strong preamp (none of these small devices have strong clean preamps). My suggestion is to spend $150 to get a small, high quality, microphone like the Audio-Technica AT8010 at Musician's Friend.
As you can see, this last option is also $300. However, you'll have to spend a wee bit more to get a tripod for the mic, and perhaps a 3-to-5 foot XLR cable to give yourself more flexibility when positioning the MicPort Pre and the microphone.
Stephanie Wingfield
Stephanie is a one-woman business who specializes in audio recording equipment. Her prices are very competitive, but more importantly she is extremely knowledgeable about all the equipment she sells. You can email her with practical decision-buying questions and she'll get back to you very quickly with a thorough response. Try that with some of the bigger stores! She doesn't sell all of the equipment I've discussed, but does sell much of it. I highly suggest reading her biography and visiting her store (complete with reviews, sound samples, and more).Professional Recorders
Even professional recording equipment has gone down in price and up in flexibility over the past 10 years. For those who want a more professional recording set up there are two additional products that I'd suggest:- Marantz PMD661. This is only a preamp and recorder. You'll need to get external microphones. (The device comes with built-in mics but they're not that good.) You can use this device with one, two, even four microphones connected! The preamps are very good, and by using the right microphone, you can easily record conversations (think "interview") or conversations between 4 people at a very high level. The PMD661 costs $599 plus the costs of the microphones that go with it. Our department has four AT8010 mics that we can use with this device.
- HHB FlashMic. This is the microphone (with preamp built into the casing) that the BBC uses for gathering news. The FlashMic only records in mono, and is built for spoken voice. But if you are interested in having a truly professional device, that's also truly mobile, then this is it. Not good for conversations, or very interactive interviews, since there's only one mic—but otherwise the best product you can buy for the purpose. The FlashMic costs $1099. Not affordable for most individuals, but a great institutional buy.
Monday, March 1, 2010
weaverFM: Amazing New Plugin
I love using the wonderful RapidWeaver softwareprogram that allows people to develop great websites with much less pain and confusion relative to using something like Dreamweaver (and hence the product's name). It's a powerful software program that also has spawned a number of third-party developers creating plugins for RapidWeaver.
About two weeks ago a new plugin was released for Rapidweaver named weaverFM where the FM stands for file management. weaverFM allows you to have a cloud-based file management system on your website where designated users (e.g. students) can upload materials, download them, create folders, and so on. It's almost as if the website is a natural extension of their own computer's desktop!
This is certainly one of the most significant plugins to be developed for RapidWeaver. I'm enthusiastically using it this semester in one of my classes. There are three key ways to learn more about this product:
Sometime in the summer I'll write an extensive review based on my semester-long experiences implementing it in one classroom.
About two weeks ago a new plugin was released for Rapidweaver named weaverFM where the FM stands for file management. weaverFM allows you to have a cloud-based file management system on your website where designated users (e.g. students) can upload materials, download them, create folders, and so on. It's almost as if the website is a natural extension of their own computer's desktop!
This is certainly one of the most significant plugins to be developed for RapidWeaver. I'm enthusiastically using it this semester in one of my classes. There are three key ways to learn more about this product:
- The RapidWeaver Central website has published a very comprehensive review of the software. Check out their weaverFM review (complete with many screenshots).
- I've created a 17 minute tutorial (for my students) about how to use this feature of my course website. The tutorial won't show you how to use weaverFM, but it will give you some decent detail about some specific ways it could be implemented in a classroom environment. You can download my tutorial (keep in mind that it's a 75 Mb download).
- Third, you can visit the man himself, Gregory Barchard, who created this amazing plugin. His website provides additional details about the plugin and how to use it. So meander on over to Greg Barchard's website.
Sometime in the summer I'll write an extensive review based on my semester-long experiences implementing it in one classroom.
Monday, February 8, 2010
Integrating Art and Poetry
Last semester I taught a doctoral level course named Multimedia Learning. Students explored the research in this area, but also they ended up creating some of their own educational multimedia products. Over the next couple of months I plan on slowly sharing some of those projects with a wider world!
First up is the Flip video created by Al. The content and reason for creating this short video is described by Al himself:
The video comes in two flavors: original size (78 Mb) and iPhone optimized (44Mb).
First up is the Flip video created by Al. The content and reason for creating this short video is described by Al himself:
Looking at the current batch of adopted California Texts, I see an attempt to integrate content and an attempt to cover material that can be of great value. At the same time, I see a formulaic approach that I hope student teachers will counter with a little more of their own creativity. Reading a textbook driven lesson on Haiku, it brought back memories of how I would teach this to elementary students. The video shows how I integrate art and writing into lessons over a two-day period.Beyond the content of the video, I wanted to share this product so people could get a better hands-on sense of what can be created with the very simple Flip camera. Notice when you watch this 6.5 minute presentation that Al has combined several different shots in different locations. All these transitions between the various clips, and the added text titles, were done using the free software that comes on the Flip video recorders. Pretty darn cool, you'll realize, when you see the video.
The video comes in two flavors: original size (78 Mb) and iPhone optimized (44Mb).
Sunday, January 31, 2010
The iPad
Unlike some people, I'm actually pretty impressed with what I've seen so far with the iPad device. It could be a real winner, and it's hard to imagine it not being a great product after 2 or 3 years at the most. There's a place for tablets (whether made by Apple or someone else). I personally don't need the 3G version as wifi would be just fine for my needs.
Given that the virtual keyboard works decently well, here's the financial reasons I'll likely be getting a first generation iPad:
There's likely other obvious things I'm not thinking about right now that would make the iPad useful to me. To me the iPad is like having a great sweatshirt—casual and comfortable. I wouldn't wear/use it in formal intensive work situations at all. But for informal, less keyboard intensive work (or play) it would be fantastic. Given the price point (about 50% of the price of a laptop I would buy), the complete package becomes very attractive.
Given that the virtual keyboard works decently well, here's the financial reasons I'll likely be getting a first generation iPad:
- Portable photo frame. I'd end up paying about $250 for a really good photo frame. The iPad looks like it will be even better than the wonderful Sony high-end models.
- Video frame. I'd willingly pay $100 for a bigger video watching device for when I'm traveling and other situations. Currently I use my iPhone for that, but the size of the iPad is much more attractive for this functionality.
- PDF reader. I'd guestimate it would be worth $50 to me to have a good size PDF reader when traveling, at home, and in other casual situations. I can use my iPhone for this, but the screen is a bit small. I already have great PDF viewing software with my iPhone that will transfer over to the iPad.
- Sketching. Okay, maybe this is only worth $25 to me. But there's some very good finger-sketching software available on the iPhone. Yet that screen is too small for my needs. However, on an iPad this finger sketching software now becomes quite useful for a variety of needs.
- Email and web. If the virtual keyboard works decently well (i.e. I can type without having to look at the keyboard all the time) then these two pieces of functionality become quite useful to me—again that extra screen space makes a difference, especially when viewing and writing to discussions at my course websites.
- OmniFocus. OmniFocus is my "to do" software of choice. It works great on a Mac, works great on an iPhone, and the syncing capabilities are solid. Adding my iPad as another device that incorporates OmniFocus would be a plus.
There's likely other obvious things I'm not thinking about right now that would make the iPad useful to me. To me the iPad is like having a great sweatshirt—casual and comfortable. I wouldn't wear/use it in formal intensive work situations at all. But for informal, less keyboard intensive work (or play) it would be fantastic. Given the price point (about 50% of the price of a laptop I would buy), the complete package becomes very attractive.
Subscribe to:
Posts (Atom)